Christmas Countdown:

Showing posts with label Sassy Studio Designs. Show all posts

Wednesday, September 26, 2012

Princess Leia - SSD Sponsorship Team

Hello and Happy Wednesday!  Today Sassy Studio Designs is spoonsoring a challenge over at Penny's Papercrafty  where the challenge theme is "More Than 1 Fold"

The card I have to show you today is an easle card and I used a new ``tool`` in my craft room!  I have finally broke down and thought that I would give a try using Glitter Ritz where I `highlighted` my background paper with a Transparent Micro Fine Glitter Ritz Glitter called Blue Highlights.  It adds a special little sparkle to the project that is not easily seen in the photos.
 
SUPPLIES USED:
* Image: Sassy studio Designs, Sassy Princess Leia
* Copic Xpress Paper
* Kodak Hero Printer
* Copic Markers (colours used listed below)
* 6.5x5 Card & Envelope
* Patterened Paper:  BoBunny 6x6 Paper Pad, Camp-A-Lot Collection
* Kraft Cardstock:  Michales 8.5x11 Paper Pack
* Crystal Glitter Ritz Transparent Micro Fine Glitter, Blue Highlight
My Favorite Things Die-Namics, Stacking Stars & Fishtail Flag Stax
* My Favorite Things Buttons, Hot Fudge
* Princess Sentiment: CC Designs
* Birthday Sentiment:  Local $ Store
* ColorBox Chalk:  Creamy Brown (around Princess sentiment)
* Zig Glue Pen (to attach stars)
* Creative Memories Precious Elements Silver Metalic Pen
* Glossy Accents
* Glue Dots (to attach buttons)
* 3D Pop Dots (for Princess Leia)
* ATG

Here is a close up of the buttons and the Birthday sentiment....
 
Here is a close up of Princess Leia to show you the Copic Colours used....
COPIC COLOURS USED:
* SKIN: E11,E00, E000
* HAIR:  E49, E59, E35, E21
* EYES:  E35, E33 + Glossy Accents
* LIPS:  R32, R30 + Glossy Accents
* OUTFIT & BOOTS:  C5, C3, C1, C000, 0 + Glossy Accents on the boots
* BELT: W7 + Creative Memories Precious Elements Silver Metalic Pen + Glossy Accents
* GUN:  W9, W7, W5

I hope that you enjoyed my card today, and maybe I inspired you to pop over to Penny's Papercrafty  to join in this fun challenge this week and maybe even win some Sassy Studio Design images!

I would also like to enter this card into the Simon Says - Anything Goes Challenge

Until Next Time, Keep Crafting!
Hugs;
Shari

Sunday, September 23, 2012

Sassy Studio Designs September Releases - Day Two

I hope that you are having a fabulous Sunday! Today at Sassy Studio Designs we are showing off to you day two of the new September Releases available in the Sassy Studio Designs store now!  If you are following the hop today you should have arrived here from the talented Jovan`s Blog.
 
Be sure to pop over to the Sassy Studio Designs Blog to start at the beginning of the hop as there are prizes to be won from the new release. There will be randomly selected comments chosen from different blogs, and winners will get 2 images of their choice from this release. There is also a special at the Sassy Studio Designs store goingon now...buy 5 images and get a 6th one free!
I was asked to showcase the new Sassy Pin Up Bunny image, but I am also going to show you the new Sassy Pin Up Cat image as well.  I decided to make something different than a card to show you, I decided to make Halloween banner as the theme to the September release is ``Halloween Party``! 
 
Here is my project that I made to show to you today.....
SUPPLIES USED:
* Sassy Studio Designs Images:  Sassy Pin Up Bunny & Sassy Pin Up Cat
* Copic Xpress Paper
* Kodak Hero Printer
* Copic Markers (colours used listedbelow)
* Cardstock:  All from 6x6 Paper Pads purchased at a local $ Store
* Cuttlebug Machine & Mini Monsters Candy Cuttlebug Embossing Folder
* My Favorite Things Die-Namics: Jumbo Fishtail Banner STAX
* My Favorite Things Die-Namics: Jumbo Banner Day Stax (the scallopped top on the banners)
* My Favorite Things Die-Namics: Designer Lables 4 Stax (for the sentiment and behind the images)
* ColorBox Chalks:  Lime Pastel & Charcoal
* Inks:  Memento Tuxedo Black & Grape Jelly
* Spiderweb Stamp: Michaels $1.50 Bin
* Spiders & Sentiment:  Inkadinkadoo Clear Stamps
* Fairy Dust Glitter - Sugar Shimmer (for bunny tail, garter, earring & cat shoes)
* Glossy Accents
* Ribbon:  Michaels CelebrateIt Basic Narrows
* Hole Punch
* Squishy Scissors (I never knew you could fall in love with a pair of scissors!!)
* 3D Pop Dots
* ATG

Here is a close up of the sentiment banner......
 
Here is a close up of the Sassy Pin Up Bunny Image.... 
 
Here is a close up of the Sassy Pin Up Cat Image....
 COPIC COLOURS USED:
* SKIN:  E11, E00, E000
* HAIR:  E49, E59, E35, E21
* EYES:  G24, G21 + Glossy Accents
* LIPS:  R32, R30 + Glossy Accents
* BUNNY OUTFIT:  R32, R30, C3, C1, C00, 0 + Fairy Dust on the tail, earrings & garter
* CAT OUTFIT:  W9, W7, W5, R32 + Fairy Dust on the shoes
 
I hope that you enjoyed today's post, and now it is time to head over to Soma's Blog to see what amazing project she has made to show you today. Good luck on the hop!
 
I would like to enter this project into the following challenges:
* Chocolate Coffee Cards Challenge #22 - Sweet Treats (I have embossed candy onmy banner)
* Heck of a Challenge - Anything Goes
 
Until Next Time, Keep Crafting!
Hugs;
Shari
 

Tuesday, September 18, 2012

Firefighter Honey - SSD Sponsorship Team

Hello, thanks for visiting today!  Today I have a card to show you that I made for a challenge that Sassy Studio Designs is sponsoring over at Party Time Tuesdays where the theme to the challenge is to make a project using RedGold and Orange.

Here is my card I made for this challenge....
SUPPLIES USED:
* Image: Sassy Studio Designs, Firefighter Honey
* Kodak Hero Printer
* Copic Xpress Paper
* Copic Markers
* 6.5 x 5 Card & Envelope
* Patterned Paper:  BoBunny 6x6 Paper Pad - Apple Cider Collection
* Burnt Orange Cardstock: frommy scraps
* Brick Wall Tim Holtz Embossing Folder
* ColorBox Chalk:  Chestnut Roan (for the brick wall)
* ColorBox Chalk: Tangerine (for around the Pattern Paper)
* Versa Color Ink: Canary (for around the outside of the card)
* Happy Birthday Sentiment:  My Favorite Things, All Occasion Sentiments
* Hot Stuff Sentiment: Hand Written
* 3D Pop Dots
* Glossy Accents
* Stickles: Silver
* ATG

Here is a close up of the image to see the copic colours used....
COPIC COLOURS USED:
* SKIN:  E11, E00, E000
* HAIR:  E29, E27, E25, E23, E21
* EYES:  E25, E23, E21 + Glossy Accents
* LIPS: R29, R24, R22 + Glossy Accents
* UNIFORM:  Y17, Y15, Y13, Y11, R29, R24, R22
* POLE:  Creative Memories Precious Element Silver Metalic Pen
* BOOTS:  C9,C7, C5 + Glossy Accents
* BADGE:  Silver Stickles


I would also like to enter this card into the following challenges:
* The Crafty Pad Challenge #188- Autumn Colours
* Papertake Weekly - Autumn Colours
* Shopping Our Stash - Emboss it! (My Brick wall is Embossed)
* Sweet Stamps Blog - Shades of Autumn
* Card Makin' Mamas - Be Punny! (My Sentiment/Firefighter, Hot Stuff! LOL)
* Crazy 4 Challenges - Anything Goes, with a Fall Twist (I used fall colours)


So what do you think? I would love to hear from you =)

Until Next Time, Keep Crafting!
Hugs;
Shari

Sunday, September 16, 2012

Pina Colada Pin Up Sassy- SSD Sponsorship Team

Hello, I am so glad you stopped by today!  Sassy Studio Designs is sponsoring a challenge at Cupcake Inspiration this week.  Here is the card that I created using the inspirational photo provided by Cupcake Inspiration....

and here is the inspirational photo for this weeks challenge....

Here is a picture of the inside of the card....
SUPPLIES USED: * Image: Sassy Studio Designs, Pina Colada Pin-Up Sassy
* Copic Xpress Paper & Kodak Hero Printer
* Copic Markers (colours used listed below)
* Patterned Paper:  My Minds Eye 6x6 Paper Pad, Everyday Flair
* Green Cardstock:  Creative Memories, Green Apple 12x12 Paper Pack
* Pink Paper:  Sandylion Designs, Pink Linen

* ColorBox Chalk:  Pastel Pink
* My Favorite Things Die-Namics:  Fishtail Flag Stax

* Happy Birthday Sentiment:  Making Memories
* Ink:  Memento Tuxedo Black
* Inside Sentiments:  My Favorite Things Stamps, Whos That Birthday Girl
* Flowers and Bling:  Michaels $1.50 bins
* Glossy Accents
* Stickles:  Star Dust
* Glue Dots (to adhear flowers)
* ATG

Here is a closeup of the coloured image to see the Copic colours used....
COPIC COLOURS USED:
* SKIN:  E11, E00, E000
* HAIR:  E29, E25, E34, E21
* EYES:  B02 + Glossy Accents
* LIPS:  R83, RV10 + Glossy Accents
* SWIMSUIT & SHOES: B06, B04, B02 
* FRUIT PICK & UMBRELLA STICK:  E53, E51
* UMBRELLA: YG05, YG03, YG01, B06, B02
* PINEAPPLE WEDGE:  E89, E87, E84, Y26, Y19, Y15, Y11
* CHERRY:  R46, R27, R24, R22 + Glossy Accents, G24
* DRINK:  R85, R83, R81, RV10, B0000 + Glossy Accents
* GLASS:  B0000 + Glossy Accents
* DRINK TRIM:  Star Dust Stickles

I would like to enter this card intothe following challenges as well;
* Heck of A Challenge - #1, Anything Goes
* Digital Tuesday Challenge - #177,Sweet Treats (my yummy drink is sweet!)
* Kaboodle Doodle Challenge - #136, Flowers (I have flowers outside and inside)

I hope you enjoyed todays card, I would love to hear from you =)

Until Next Time, Keep Crafting!
Hugs;
Shari

Saturday, September 8, 2012

Oooh-la-la France Honey - SSD Sponsorship Team

Hello and thanks for visiting my blog today!  Sassy Studio Designs is sponsoring a chalenge over at Craftymess Challenge Blog where the theme is "Vintage Paris".  The card that I made for this challenge to show you is a birthday card for a friend of mine named Sonia.  Sonia is originally from Montreal Canada, so I thought this challenge would be perfect for a "french" little lady =)  Here is my card....
To make this card look "Vintage"  I destressed all the edges of the papers and chalked the shape behind the image in hopes to make it follow the challenge theme.  I love how this card turned out!

Here is a picture of the inside of the card....
SUPPLIES USED:
* Image:  Sassy Studio Designs, France Honey
* Copic Xpress Paper & Kodak Hero Printer
* Copic Markers (colours used listed below)
* 6.5x5 card & envelope
* Patterned Paper:  Carta Bella 6x6 Paper Pack - Paris Girl
* Kraft Cardstock:  Michaels Recollections 8.5x11 Paper Pack
* My Favorite Things Die-Namics: Labels 4 Stax & Flag Stax
* Oooh-la-la Sentiment: Hampton Art from Michaels
* Ink:  Memento Rich Cocoa
* Inside Sentiment:  Micahels $1.50 bin
* Ink:  Memento Tuxedo Black
* Close To My Heart Edge Destresser tool
* Colorbox Chalk:  Creamy Brown
* Glossy Accents
* 3D Pop Dots
* ATG

Here is a closeup of the image to see the Copic colours used....
COPIC COLOURS USED:
* SKIN:  E11, E00, E000
* HAIR:  E23, YR24, Y26, YR21
* EYES:  B37, B34 + Glossy Accents
* SHIRT, SHOES & LIPS:  R56, R85, R83, R81 (Glossy Accents on Shoes & Lips + C1 on white parts of the Shirt)
* BARRET, SCARF & SKIRT:  100, C9, C7, C5 + Glossy Accents
 
So what do you think, she is pretty Sassy in her french barret, Oooh-la-la!  Thanks for visiting and I would love to hear from you if you have time to leave a comment =)
 
Until Next Time, Keep Crafting!
Hugs;
Shari


Thursday, August 30, 2012

Police Officer Honey - SSD Sponsorship Team

Hello and Happy Thursday!  Today Sassy Studio Designs is sponsoring an awesome challenge over at C.R.A.F.T. Challenge.  The challenge is to create a "Shaped Card". 

I had so much fun making the card to show you today and to enter into the C.R.A.F.T. Challenge!  I pulled out my dusty Cricut and got to work right away to may the "shape" for this card, let me know what you think......
So.... Do you like the Donut???  Pretty cute to put it with Police Officer Honey huh?!

Here is a picture of the inside.....
SUPPLIES USED:
* Image:  Sassy Studio Designs, Police Officer Honey
* Copic Xpress Paper & Kodak Hero Printer
* Copic Markers (colours used listed below)
* Cricut & Sweet Shop Cricut Lite Cartridge (purchased at Wal*Mart) Donut cut at 5" (all 4 layers)
* Outside Sentiment:  My Favorite Things, All Occasions Sentiments
* Inside Sentiment:  Computer generated
* Kraft, Brown and Ivory Cardstock:  Michaels Recollections 8.5x11 Paper Packs
* Pink Cardstock:  Creative Memories, Pink Shimmer 12x12 Paper Pack
* Glossy Accents
* Zig Glue Pen
* ATG

Here is a close up of the image to see the Copic colours used....
COPIC COLOURS USED:
* SKIN:  E11, E00, E000
* HAIR:  E49, E59, E25, E23, E21
* EYES:  B95, B93 + Glossy Accents
* LIPS:  R81, RV10 + Glossy Accents
* UNIFORM:  C9, B99, B97, B95
* HAT PEAK, BOOTS & BELT:  C9, C7, C5 + Glossy Accents on Hat Peak
* HAT BAND, STRIPE ON SHORTS:  R81, RV11, RV10
* BADGE ON HAT:  C3, C1, C00 + Glossy Accents 
* BUTTONS, HANDCUFFS & SHIRT BADGE:  Creative Memories Precious Elements Silver Metalic Pen + Glossy Accents


I would like to also enter this card into the following challenges:
* The Stamping Boutique Challenge Blog: Anything Goes with a Birthday Twist
* Simon Says Stamps Challenge:  Anything Goes
* Shopping Our Stash Weekly Challenge #66: Use Your Favorite Things (I used my all time favorite COPIC MARKERS!)
* Charisma Cardz Challenge #34: No Embellishments
* Little Miss Muffet Challenge #42: Pink, Pink, Pink (I have pink on the donut, the officer and inside the card)


I hope you enjoyed today's post and I would love to hear from you to know what you thought =)

Until next time, Keep crafting!
Hugs;
Shari

Saturday, August 25, 2012

SSD August Release: Vicious Villain Honeys - Ursula

 
For my "4 MONTHS TILL CHRISTMAS HOP" & to find out who the WINNER OF MY CHRISTMAS CANDY is, just scroll down and you can find out below this post!
 
 
Hello and Happy Saturday!  I hope that you are having a fun weekend so far hopping through the Sassy Studio Designs DT blogs seeing all the new just released "Vicious Villain Honeys". 
 
If you are following the hop you should have arrived here from the super talented Kate's Blog. If you happened to pop by my blog just by chance, then please go to the beginning of the blog hop at the Sassy Studio Designs Blog to get started.
 
Today's releases are so amazing, and I was so very lucky to get to work with my favorite villain of all - Ursula from The Little Mermaid!  This is my FAVORITE Disney movie of all time - sorry it even tops Old Yeller for me! 
 
Well without further ado, here is my card I made to show you today using the amazing Ursula.....
For this card I printed out Ursula, then printed out the ocean digi on Copic Xpress paper, coloured the images then fussy cut them out. Then I also printed the ocean image on the blue background paper to get the layered look you see.

SUPPLIES USED:
* 6 x 5.5 Card& Envelope
* Image: Sassy Studio Designs - Ursula
* Image:  Make It Crafty - Ocean Scape
* Copic Xpress Paper & Kodak Hero Printer
* Copic Markers (colours used listed below)
* Blue paper for background from my stash
* Black/Purple Cardstock: Core'dinations CoreColor
* Sanding Block to bring out the purple in the cardstock
* Cuttlebug & Polka Dot Cuttle Bug Folder
* Sentiment: Computer Generated and printed on Copic Xpress Paper
* Sentiment Flag Die:  My Favorite Things DieNamics Fishtail Flag Stax
* Glossy Accents
* Purple Bling:  Michaels $1.50 Bin
* Scissors (I have finally foundan amazing pair of scissors called "Squishy Scissors" that I purchased from my favorite store One Crazy Stamper - THANK YOU LORA FOR TELLING ME ABOUT THESE AMAZING SCISSORS!!)
* 3D Pop Dots (for Ursula)
* Zig Glue Pen (to attach the castle and ocean bottom to the blue background)
* ATG

Here is a close up of the image to see the Copic colours used...
 URSULA COPIC COLOURS USED:
* SKIN:  BV02, BV01, BV00, BV000
* TENTACLES:  BV04, BV02, BV01, BV000 + Glossy Accents
* BODY:  100, C9, C7, C5, BV04
* HAIR:  C5, C3, C1, C00, BV0000, 0
* EYEBROWS:  C9, C7
* LIPS & NAILPOLISH:  R39, R46, R35 + Glossy Accents
* EARRINGS:  BV08, BV04, BV02 + Glossy Accents
* EYES:  BV04, BV02 + Glossy Accents
* TRITON'S STAFF & NEAKLACE:  YR27, YR24, YR21
* EYESHADOW:  BG07, BG05

BACKGROUND IMAGE COPIC COLOURS USED:
* CASTLE & OCEAN BOTTOM:  E47, E49, E43, E42, E41, E40
* CASTLEWINDOWS:  Y11 + Glossy Accents
* PLANT:  BV04, BV02
* STARFISH:  YR27, YR24,YR21 + Glossy Accents
* SHELLS:  E02, E01, E00 + Glossy Accents
* FISH:  YR27, YR24, YR21, YR20 + Glossy Accents
* FISH BUBBLES ON THE CASTLE:  B95 + Glossy Accents

So, what did you think? Iwould love to hear from you!  Your next stop on the hop is the wonderful Jamie's Blog.  Be sure to complete the hop as there are games and prizes to be won, just pop over to the Sassy Studio Designs Blog for all the details - you won't want to miss out on the fun!

Have a great weekend and I will be back very soon with a Wedding card to show you from the Wedding I am attending while you are reading this post =)

Until Next Time, Keep Crafting!
Hugs;
Shari

Tuesday, August 21, 2012

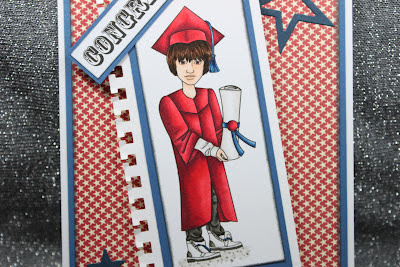
The Graduate - SSD Sponsorship Team

Hello blogland and welcome!  Today I have a card to show that I made for the new challenge over at Tuesday Alchemy that Sassy Studio Designs is sponsoring this week, and the challenge theme is: "Learn With Joy".

The card I am going to show you is a card I was asked to make by one of my very most favorite person - my friend Karen.  Her son Bailey has graduated from Grade 8 and is shortly going off to high school - her little baby is all grown up!  The only questions I asked Karen before starting this card was what were his school colours and I was told Blue, Red and White and here is what I came up with....

Here is a look at the inside....
SUPPLIES USED:
* Copic Xpress Paper & Kodak Hero Printer
* 5.5x6 Card & Envelope
* Patterned Paper:  JilliBean Soup Christmas Eve Chowder 6x6 Paper Pad
* Cardstock: from my scraps
* EK Notebook Boarder Punch
* Congrats Sentiment: freebie paper sentiments from a UK Magazine
* Inside Sentiment: Kraftin' Kimmie Stamps, Snips & Snails Stamp Set
* ColorBox Chalk: Charcoal
* CreativeMemories Square Punch to makeflag look on the inside sentiment
* Zig Glue Pen
* 3D Pop Dots
* ATG


Here is a close up of the image to see the Copic colours used....
COPIC COLOURS USED:
* SKIN:  E11, E00, E000
* HAIR:  E49, E59, E25
* EYES:  E25
* LIPS:  E11
* ROBE & CAP:  R59, R39, R37, R35
* TASSEL:  B39, B37, B34
* PANTS:  W9, W7, W5
* SHOES:  W7, W5, W1, W00, B37 (laces)
* SHIRT:  W3, W1, W00
* DIPLOMA:  R59, R39, R37, R35, B39, B37, B34, W3, W1, W00, 0
* GROUND:  W5, W3, W1

I had originally planned to show you a picture of my friend Karen's son Bailey, however my silly laptop is not allowing me to crop and edit the photos that I was sent to use.  The reason I chose this image to use for Bailey's Grad card is because the image looks sooo much like him - just was a perfect image to use!

I hope that you enjoyed this post and maybe I even inspired you to create a project and enter the challenge at Tuesday Alchemy!

Until Next Time, Keep Crafting!
Hugs;
Shari

Wednesday, August 15, 2012

Pregnancy Pin Up - SSD Sponsorship Team

Hello and happy Wednesday! 

Today Sassy Studio Designs is sponsoring a challenge at the Card Mania Challenge Blog and the challenge theme is: "Anything Goes".

Here is my card that I made as a Guest Designer this week for Card Mania Challenges......

Here is a look at the inside of the card......
 SUPPLIES USED:
* 4x5.5 Card & Envelope
* Image:  Sassy Studio Designs,Pregnancy Pin Up
* Copic Xpress Paper & Kodak Hero Printer
* Copic Markers (colours used listed below)
* Spellbinder Nestabilities: Lacey Circles
* Patterned Paper:  JilliBean Soup, Christmas Eve Chowder 6x6 Paper Pad
* Blue Cardstock:  From my local $ Store 6x6 Paper Pad
* Blue Gems:  from Michaels $1.50 bin
* Sentiment on outside:  Inkadinkadoo
* Sentiment on inside:  Michaels $1.50 bin
* Versa Mark with Stampin'Up Tempting Turquoise Embossing Powder used on the outside sentiment
* Creative Memories 3/4 Square Punch to create the flag look on the sentiment
* Ink on the inside: Close To My Heart, Crystal Blue
* 3D Pop Dots for the sentiment
* ATG

Here is a close up of the image to see the Copic colours used.......
COPIC COLOURS USED:
* SKIN:  E11, E00, E000
* HAIR:  E59, E25, E31
* EYES:  E25, E23
* LIPS:  R85, R81
* EYESHADOW:  E70
* OURFIT:  B16, B14, B12, R85, R81
* GROUND:  E40, E44, E42, E41

I hope that I have inspired you to pop over to Card Mania Challenge Blog to enter into their Anything Goes challange this week =)

Just a reminder, you only have until August 20th to enter my Christmas Candy draw!  Just click on the picture of my candy at the top left sidebar on my blog =)  Hope you can join in on the fun!
Until Next Time, Keep Crafting!
Hugs;
Shari

Saturday, August 11, 2012

SSD It's a Small World After All Release & Blog Hop Part 2

Have you entered my Christmas Candy yet? If not click HERE to enter, ends August 20th!


Welcome to the "Sassy Studio Designs "It's A Small World After All, Part 2"" Blog Hop, and we are also celebrating "Lindsay's Birthday" the illustrator of Sassy Studio Designs, and her birthday is TODAY!!!!
Happy Birthday Lindsay, what a way to celebrate but to have this awesome Release and a Surprise Birthday Celebration Hop! We have some AWESOME Prizes so make sure you visit each and every blog because you are going to have to collect some letters to make out a saying. We also have a Trivia of Questions on our main Sassy Blog I have two letters for you, did you figure them out? 
If you happened by my blog just to visit, then pop over to the Sassy Blog to read all the details and to see the trivia questions for your chance to win 1 of 6 prizes up for grabs as well a the full list of the hop order.

Now if you arrived here from Mary's blog then your in the right place!
Today I am showcasing another country for you - you have seen my Canada Honey image from last months release and this months release I am about to show you the new JAPAN Honey image, I just love how Lindsay represented each country she really has outdone herself!  Here ismy card I made to show to you......

Here is apicture of the inside of the card.....
 SUPPLIES USED:
* 6.5x5 Card and Envelope
* Image:  Sassy Studio Designs, Japan Honey
* Copic Xpress Paper
* Copic Markers (colours used listed below)
* Patterned Paper:  First Edition Paper 6x6 Pad, New Leaf
* Black Cardstock: all from my scraps!
* Spellbinders Nestabilities: Labels 9
* Cuttlebug to cut out Spellbinders shapes
* Sentiment Stamps:from my local $ Store
* Ink:  Memento Tuxedo Black
* Glossy Accents
* 3D Pop Dots
* Scissors and CraftKnife
* ATG

**TIP:  If you use Spellbinders Nestabilities maybe you feel the same as me, I find the sizes are two far apart to double mat with so, what I did was cut out both my patterned paper and my cardstock the same size, then i embosed the patterned paper so that I have a line to cut around it with scissors so that I had enough space to show a mat behind the shape - let me know if this tip is helpful to you!

Here is a close up of the gorgeous image to show you the Copic colours used as wella the Spellbinder Nestabilities tip listed above.....
COPIC COLOURS USED:
* SKIN:  E00, E000, E000 (went with a light skin colour to show a paler shade for moreofaJapanskin tone)
* HAIR:  100, C9, C7, C5
* EYES: E47, E44, Glossy Accents
* LIPS:  E95, E93, Glossy Accents
* CHOPSTICKS:  E55, E53, Glossy Accents
* GOWN:  100, C9, C7, C5, YR16, YR14, YR12,YR00
* UMBRELLA:  E55, E53, 100, C9, C7, C5, Glossy Accents, YR16, YR14, YR12,YR00

Next up on the hop is the talented Kim!  If you get lost along the way, just pop back over to the Sassy Studio Designs Blog for the full order.
I hope that you enjoyed today's post and good luck on the hop and also on the trivia questions!

Until next time, keep crafting!
Shari
Related Posts Plugin for WordPress, Blogger...