I found an amazing giveaway on a blog today when I was looking around the web, please head over to Creating from the Heart (Keepsakes by Melissa) to check it out!
Melissa is offering an ♥Annual End of the Year/ Christmas Giveaway!!! ♥ with fabulous prizes that you wont want to miss out on!
Please go over to her website and become a follower and spread the word about her giveaway for you to have a chance to win her prize like I did!
Wishing you good luck and Happy New Year!
Shari
Christmas Countdown:

Monday, December 26, 2011
Friday, December 23, 2011
Are you finished your Christmas cards yet? If not here are some more for inspiration..
Only "2" more days till Christmas!! Are you finished making all your Christmas cards yet??
I think this will be the last post I do before Christmas, so I though that I would show you a few more Christmas cards in case you are still working on yours, so I hope you get some inspiration from these :)


I think this will be the last post I do before Christmas, so I though that I would show you a few more Christmas cards in case you are still working on yours, so I hope you get some inspiration from these :)
This one is made using a Magnolia Edwin Stamp. I really like working with Magnolia stamps, they are so fun to colour!....

A closer look at Edwin all tangled up in his lights.....
COPIC COLOURS USED:
Skin: E01,E00,E000
Hair: E18,E19,E17
Shirt: C1,C0,0
Pants: B99,B97,B95,B93,B91
Shoes: W7,W5,W3
Light bulbs: R29,R27,R24,YG05,YG03,YG01,Y17,Y15,Y13,
B02,B01,B00,YR15,YR14,YR12 + Clear Glaze Pen
B02,B01,B00,YR15,YR14,YR12 + Clear Glaze Pen
My second card I want to show you, I made for my friend Sara who LOVES owls. I found this free digi download stamp at Scrappy Fairy ...

A Closer look at the colours of the Christmas owl...

COPIC COLOURS USED:
Santa Hat & Candy Cane: R29,R27,R24,R22 + White Glaze Pen
Bell, Feet & Beak: YR24,YR23,Y26
Wings & Outside of Eyes: E18,E17,E15,E13
Eyes: E41,E40 + Clear Glaze Pen
Body: E25,E23
Heart: E42,E41
The Merry Christmas sentiment on the front of the card is from the $1.50 bin at Michaels and stampped in Scarlet Red Cats Eye. The frame around the owl is Spellbinders Nestabilities - Lacey Circles.
My third card was a card I made for my friend Linda who is a little bit of of turtle freak :) This image I found on a kids Colouring Book Pages site.....Isn't he just so cute!

Here is a closer look at how happy the little turtle is slidding down a snowy hill in his shell.....

COPIC COLOURS USED:
Turtle Body: YG99,YG97,YG95, YG93, YG91
Turtle Shell: E49,E47,E44,E43,E42,E41
Hat: YG67,YG63,YG61,R29,R27,R24,R22
Eye: B91
Snow: BG0000,B0000
You can not really tell in the photo, but I also heat embossed snowflakes on in the sky with clear embossing powder to give the picture some dimention. Also I heat embossed the circle sentiment in silver embossing powder. The sentiment is from Michaels $1.50 bin and is from the December set.
And my fourth and final card before we break for Christmas holidays is my Mistletoe Mice from Stampaive that I made for my neighbours as they are a newly dating and such a sweet couple, so I thought that they deserved a cute card....

A closer look at the kissing mice, don't they look so happyily in love?.....

COPIC COLOURS USED:
Girl Mouse: W5,W3,W1,W0
Girl Shirt & Bow: R39,R37,R35,R32,YG63
Boy Mouse: E49,E47,E44,E43
Boy Mouse Shirt: YG67,YG63,YG61
Girl Ears, Hands, Feet & Tails: R81,RV00,RV000
Boy Ears, Hands, Feet & Tails: E11,E00,E000
Noses: R83
Mistletoe: YG67,YG3,YG61
For the frame on the card I used the Spellbinders Nestibilities - Lacey Squares.
I hope that you enjoyed today's post and maybe got some inspiration to complete your cards if you have not yet done so.
I would like to wish everyone a SAFE and HAPPY CHRISTMAS to you and your families. Hope to see you back again after the Holiday!
All The best, Merry ho ho;
Shari
Thursday, December 22, 2011
I won at Sassy Studio Designs! Whoo Hoo!
Oh My Goodness, I am so very excited and HAPPY!! I have to tell you all about it!
My "A Christmas Story" Leg Lamp card was a WINNER on Sassy Studio Designs Challenge #103.
 I hope you don't mind me sharing my excitement with you, I am just flabbergasted!! This December was my first time entering in some challenges so I am so very happy I was chosen, makes me want to create right now! Can't wait to tell hubby that his Christmas card is a WINNER, he he he!
Thanks so much for checking out my blog and I will see you soon!
Shari
My "A Christmas Story" Leg Lamp card was a WINNER on Sassy Studio Designs Challenge #103.

Thanks so much for checking out my blog and I will see you soon!
Shari
Wednesday, December 21, 2011
Creatures were stirring!
With only 4 more days till Christmas, you should have all your decorating completed (well hopefully), but if not maybe these little guys can help you out.....

I am soooo in love with House Mouse Design stamps! They stamp so nice and are wonderful to colour with your copics! The stripe paper is from Michaels Recollection Christmas paper pack, and the red cardstock is Bazill Polk-a-dots. The Merry Christmas stamp is an old wooden block that I have had for many many years (long before I was scrapbooking and cardmaking) so I am not sure on the brand.
Here is a close up of the little mice....

I would like to enter this card into the following challenges;
* House Mouse Design - Challenge #109 Warm Fuzzies
* One Crazy Stamper - Christmas/Holiday Challenge
Thank you for visiting today, I would love any comments that you may have.
Wishing all a Wonderful Christmas and a very Happy New Year!
Shari

I am soooo in love with House Mouse Design stamps! They stamp so nice and are wonderful to colour with your copics! The stripe paper is from Michaels Recollection Christmas paper pack, and the red cardstock is Bazill Polk-a-dots. The Merry Christmas stamp is an old wooden block that I have had for many many years (long before I was scrapbooking and cardmaking) so I am not sure on the brand.
Here is a close up of the little mice....

COPIC COLOURS USED:
Mouse Faces: E11, E00, E000, E02
Left Mouse: E47, E44, E43
Right Mouse: W7, W5, W3
Light Cord: G29, G28, G07
Rope: R29, R27, R24
Rope: R29, R27, R24
Clothes Pegs: E42, E41, E40
Light Bulbs: R29, R27, R24, R22, Y17,Y15, Y13, Y11
I would like to enter this card into the following challenges;
* House Mouse Design - Challenge #109 Warm Fuzzies
* One Crazy Stamper - Christmas/Holiday Challenge
Thank you for visiting today, I would love any comments that you may have.
Wishing all a Wonderful Christmas and a very Happy New Year!
Shari
Tuesday, December 20, 2011
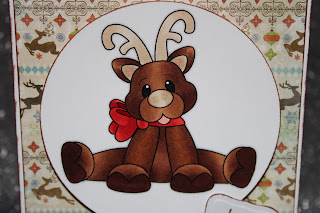
"Olive" the other Reindeer
Only 5 more days till the Big Guy comes to your house with Rudolph and the gang.
I made this card for my very good friend Karen and her family :) and as I was colouring it I started to sing...

Inside sentiment....is from CC Designs "Sparkly Wishes" that I purchased at One Crazy Stamper

I made this card for my very good friend Karen and her family :) and as I was colouring it I started to sing...
Rudolph the red nosed reindeer, had a really shiny nose
And if you ever saw him, you would even say it glows.
"OLIVE" the other reindeer, used to laugh and call him names,
They never let poor Rudolph, join in any reindeer games....

SUPPLIES:
Free digi stamp from Little Scraps of Heaven
Spelbinders Nestabilities - Classic Circles & Labels Eight
Papers: BoBunny 6x6 Blitzen Collection Paper Pack
Sentiment Stamp: Stampendous Cling Rubber - Little Christmas
Liquid Chalk by Catseye - Chestnut Brown
A close up of the cute little reindeer......

COPICS USED:
Reindeer: E27, E25, E23
Hoofs: E29, E27
Antlers & Nose: E41, E40
Ears: E41, E40, R20
Tongue: R20
Bow: R29, R27, R24, R22
Inside sentiment....is from CC Designs "Sparkly Wishes" that I purchased at One Crazy Stamper

I would like to enter this post into the following challage:
I hope you enjoyed this post and fell in love with Olive like I did, Happy and safe Holidays to you and your family.
Shari
Monday, December 19, 2011
A Christmas Story Card for my Honey!
Wow look at me, two posts in one day, whoo hoo! After you finish checking out this post scroll down to view my "Kraftin Kimmie Christmas Cards".
For those of you that know my crazy hubby, you know that his favorite Christmas movie that he makes me watch every year is "A Christmas Story", for some reason he thinks it is a "Classic" and funny as all heck! Must be a guy think I thing!
Well with that being said, I was on a blog (DZ Doodles) and found a free digi stamp of the leg lamp from A Christmas Story movie and knew as soon as I saw it that I HAD to make my hubs a card with it for this Christmas. I looked into purchasing him the actual lamp for Christmas to put in his Man Cave, but it was way out of our budgeted price range, so the card will have to do for this year, he he he.
A close up of the lamp....

COPIC COLOUS USED:
Leg: E11, E00, E000
Shoe: C9, C7, C5
Base: E29, E27, E25
Lamp Shade: Y17, Y15, Y13
The printed paper is from this years Michaels Recollection Christmas Paper Pack, the mirrored red cardstock is from my stash and sorry to say I have had it for so long I do not remember the brand name. I inked the card base and the printed paper with Catseye Scarlette Red and the candy cane ribbon I used was from Michaels.
I am entering this card into the following challenges;
Sasy Studio Design -Christmas Movie challange
One Crazy Stamper Christams/Winter
I am entering this card into the following challenges;
Sasy Studio Design -Christmas Movie challange
One Crazy Stamper Christams/Winter
I hope that you enjoyed this post as much as I enjoyed making this card. Hope to see you back soon. Merry Christmas and Happy New Year to all!
Don't forget to scrolldown to my earlier post to see my Kraftin' Kimmie Christmas cards :)
Don't forget to scrolldown to my earlier post to see my Kraftin' Kimmie Christmas cards :)
Shari
A Kraftin' Kimmie Christmas :)
Hello blog land friends! Only 6 more days till Christmas and I have just finished all my Christmas cards but still working on tags.
Today I would like to show you a few Christmas cards that I have made this year using some of my fabulous Kraftin' Kimmie Stamps.
Grab a coffee, tea or hot cocoa and sit back and relax. If you have not yet finished your cards, I hope that you get some inspiration from my cards below :) Since this post will be a little lengthy I will not be noting the Copic colours I used so if you are interested in a certain card and the colours I used just ask and I will let you know :)

Stamp: Balancing Elf
Paper: BoBunny 6x6 Blitzen Collection

Stamp: Sheppard with sentiment (part of the Nativity set)
Paper: BoBunny 6x6 Snowfall Collection

Stamp: Sophia
Paper: Bazzill embossed poka dots
Ribbon: from Michaels

Stamp: Rudy
Paper: Michaels Recollections Chrstmas Paper Pack
Ribbon: Michaels

Stamp: Santa's Heavy Load
Paper: Echo Park 6x6 Winter Park Paper Pack
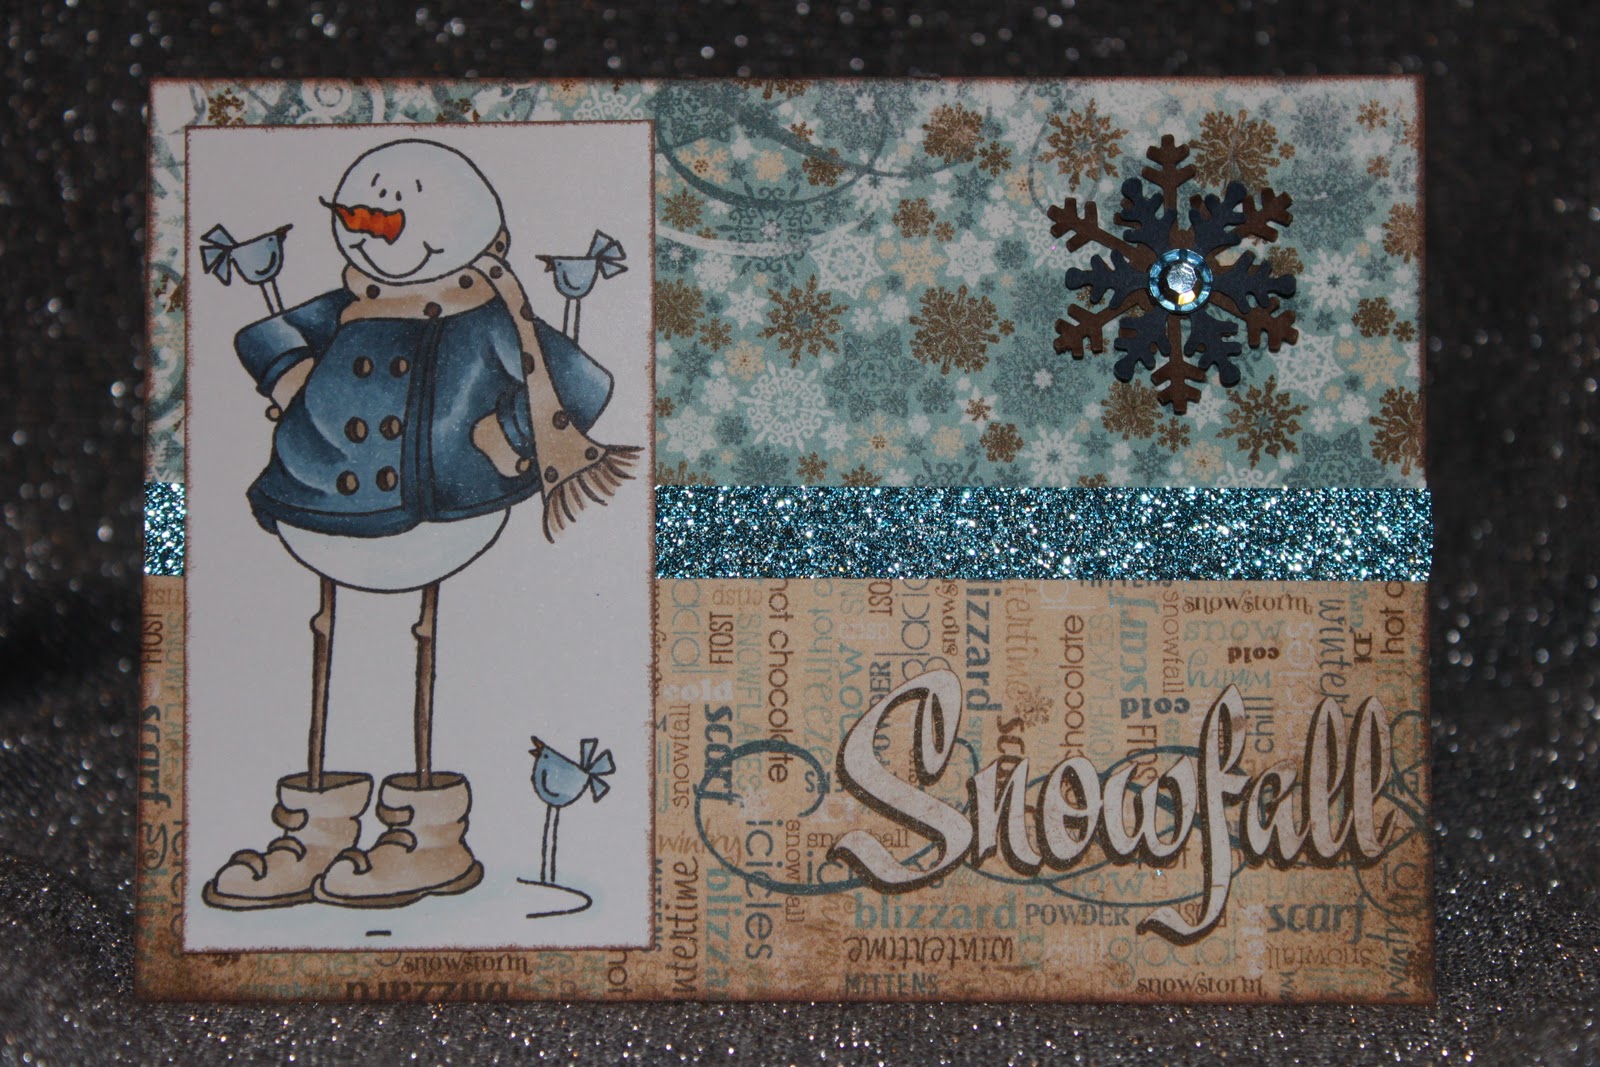
Stamp: Frosty Friends
Paper: BoBunny 6x6 Snowfall Collection
Ribbon: Michaels

Stamp: Eva
Paper: 2010 12x12 Jillibean Winter Collection
Cardstock: Recollections red & cream
I hope you enjoyed my Kraftin' Kimmie Christmas cards! Will be back tomorrow with some other cards I made as well. Wishing you a very Merrry Christmas and a Happy New Year!
Shari
Sunday, December 4, 2011
Gift Wrapping Elf
Hello blogger friends! Sorry to have been away for so long, had some family matters to deal with and was not able to blog or play in my palace.
Today I have a wonderful Christmas card to show off to you.....

And the inside with sentiment......
 SUPPLIES USED:
*Stamps: Kraftin' Kimmie Gift Wrap Elf and Interior Christmas Sentiments
* Patterned Papers: Jillybean Soup, Christmas Eve Chowder 6x6 pad
* Cardstock: Creative Memories Green Apple
* 5x7 Card and Envelope
* 3D pop squares
* Stampin Up Jewlery tag punch
* Merry Christmas sentiment for tag
* Ivory twine from the $ store
* Chestnut Brown and Lime Cats Eye liquid chalk
* Copic Markers (colours lissted below)
A close up of the coloured image......
 COPIC COLOURS USED:
* Skin: E11,E00,E000
* Clothes: R81,R83,R85,B02,B01,B000
* Hair: E59,E57,E55
* Tonge/Mouth: R24,R22,W7
* Ribbon Wheel: E59,E57,E55
The present and the ribbon were both paper pieced with the matching patterned paper and cardstock used on the card.
This card was very fun to make and for me it was pretty exciting because I did not use traditional Christmas colours which I usually do, so for that I am proud of myself!! :)
I hope you enjoyed this post and I also hope to be back real soon with more cards to show you. Have a great day and I will see you soon.
Shari
Today I have a wonderful Christmas card to show off to you.....

And the inside with sentiment......

*Stamps: Kraftin' Kimmie Gift Wrap Elf and Interior Christmas Sentiments
* Patterned Papers: Jillybean Soup, Christmas Eve Chowder 6x6 pad
* Cardstock: Creative Memories Green Apple
* 5x7 Card and Envelope
* 3D pop squares
* Stampin Up Jewlery tag punch
* Merry Christmas sentiment for tag
* Ivory twine from the $ store
* Chestnut Brown and Lime Cats Eye liquid chalk
* Copic Markers (colours lissted below)
A close up of the coloured image......

* Skin: E11,E00,E000
* Clothes: R81,R83,R85,B02,B01,B000
* Hair: E59,E57,E55
* Tonge/Mouth: R24,R22,W7
* Ribbon Wheel: E59,E57,E55
The present and the ribbon were both paper pieced with the matching patterned paper and cardstock used on the card.
This card was very fun to make and for me it was pretty exciting because I did not use traditional Christmas colours which I usually do, so for that I am proud of myself!! :)
I hope you enjoyed this post and I also hope to be back real soon with more cards to show you. Have a great day and I will see you soon.
Shari
Thursday, November 17, 2011
Happy Anniversary
On Saturday (November 12th) it was my husbands and my 6th Anniversary. For the 6th year we headed to Niagara-On-The-Lake and Niagara Falls for the weekend. We visited many wineries and tasted some amazing wines in both 20 Valley and in Niagara-On-The-Lake - came home with 11 yummy bottles of reds, mostly from the 2007 season as that was the best year for grapes.
below you will see the card I made for my amazing hubby....

The inside......

A close up of the mice....
 COPIC COLOURS USED:
* MOON: E43, E42, E41, E40
* GRASS: YG67, YG63
* GROUND: E47, E44, E43, E42
* TAILS, EARS & FACES: E11, E00, E000
* SMALLMOUSE: W5, W3, W1
* LARGE MOUSE: W9, W7, W5
My Wonderful husband bought me roses - pink for my favorite colour, yellow for my favorite roses and red for LOVE :)

and i also got some BLING...with my March birthstone - G E O R G E O U S !!!

below you will see the card I made for my amazing hubby....

SUPPLIES USED:
* 5X7 card and envelope
* Copic paper
* Kraft cardstock (recollections)
* Green patterned paper from my stash
* Stamp- House Mouse Designs
* Stamp - Happy Anniverary (old stamp supplier unknown)
* Creative Memories paper ribbon
* Creative Memories "Love" sticker You Light Up My Life (inside sentiment)
* Chestnut Brown stamp pad (recollections)
* Clear embossing powder (recollections)
* Copic Markers
* Cuttle Bug embossing folder - Divine Swirls
* Spellbinders Nestabilities - Labels 18


* MOON: E43, E42, E41, E40
* GRASS: YG67, YG63
* GROUND: E47, E44, E43, E42
* TAILS, EARS & FACES: E11, E00, E000
* SMALLMOUSE: W5, W3, W1
* LARGE MOUSE: W9, W7, W5
My Wonderful husband bought me roses - pink for my favorite colour, yellow for my favorite roses and red for LOVE :)


Thank you for visiting today, and I will be back soon with some other cards for you to see :) Comments always welcome, hope to chat to you soon.
Shari
Monday, November 14, 2011
Dad's Birthday
On November 9th it was my Daddy's 62nd Birthday. My mom runs a craft and painting business and my Dad helps her out by cutting a lot of her wood pieces for her painting classes, so when I found this stamp I knew I was going to use it for my Dad.....


SUPPLIES USED:
* 5x7 card and envelope
* yellow, denim and red star papers from my stash
* 2x yellow star brads
* blue button
* Happy Birthday Stamp
* Best wishes stamp
* Copic Markers (colours listed below)
* Stampaive Stamp - Mr. Fix It by Laurence Collection
Inside..


COPIC COLOURS:
* BEAR - E47,E44,E43,E42
* SHIRT - R29,R27,R24
* PANTS - B99,B97,B95,B93
* TOOLS - C7,C5,C3,C1,C0,Y17,Y15,Y13,R27,R24
* PENCIL - Y17,Y15,R35
* SUSPENDERS - Y17,Y15
* GROUND - C3,0
It was really fun making this card for my Dad, I hope you enjoyed seeing it :)
Shari
Friday, November 11, 2011
My Day with Kimmie and the Krafty Girls
My 2nd post of the day, Oh my what has gotten into me, he he he. Be sure to check out the first post below this one too :)
On October 16th I went to St.Thomas to spend the day with Kraftin' Kimmie and the Krafty Girls at their 2nd annual Krafty Day. As you can tell from most of my posts on this blog I REALLY REALLY like Kraftin' Kimmie stamps! Check out Kimmie's store at http://www.kraftinkimmiestamps.com/ and see what stamps she has.
I wanted to share a couple pictures with you that I took and also a picture of the 4 make and takes that we were able to make that day.
The first picture is of Kimmie and her Krafty girls....

The next picture is of Annie and she is one of the stamp artist (and my favorite)....during the day we got to watch Annie paint and draw some images, she is so talented!

Below is a picture of the four make and takes we did, they were so fun and all were using the NEW stamps available at Kraftin' Kimmie.....one is a card, one is a gift card holder, one is a bookmark and one is a tag.

On October 16th I went to St.Thomas to spend the day with Kraftin' Kimmie and the Krafty Girls at their 2nd annual Krafty Day. As you can tell from most of my posts on this blog I REALLY REALLY like Kraftin' Kimmie stamps! Check out Kimmie's store at http://www.kraftinkimmiestamps.com/ and see what stamps she has.
I wanted to share a couple pictures with you that I took and also a picture of the 4 make and takes that we were able to make that day.
The first picture is of Kimmie and her Krafty girls....


Below is a picture of the four make and takes we did, they were so fun and all were using the NEW stamps available at Kraftin' Kimmie.....one is a card, one is a gift card holder, one is a bookmark and one is a tag.

I am looking forward to going to Kimmie's Krafty Day again next year! Thanks for coming by to see me and I will see you soon.
Shari
30th Anniversary
Just this part week two of our good friends celebrated their 30th Anniversay, wow! My husband and I are celebrating our 6th tomorrow,30 seems so far away, can not wait to get there too :) Our friends are a very "Cool" couple so they deserved a very "Cool" card......

 A closeup of the coloured images...


SUPPLIES USED:
* White cardstock (recollections), used one full 8.5x11 sheet folded in half to make the card
* Red cardstock (recollections)
* Black cardstock (recollections)
* Silver cardstock (recollections)
* Baby blue cardstock (recollections)
* Creative Memories "Everyday" patterned paper
* Catseye Scarlete Red pigment ink
* Glossy Accesnts (for the windshield and headlights)
* Kraftin' Kimmie stamp - Danny
* Kraftin' Kimmie stamp - Joannie
* Cricut Cartridge "Nifty Fifty" for the car
* Creative Memories "for those we Love" vellum sentiment
* computer generated sentiment for front of card
* Copic Markers (colors listed below)
* Sakura Glaze Pen
Inside:


COPIC COLOURS:
* SKIN - E11,E00,E000
* HAIR, DANNY - E29,E27,E25, JOANNIE - YR24,Y26,YR21
* JACKET & SHOES, DANNY & JOANNIE PANTS - W9,W7,W5
* PANTS, DANNY - W7,W5,W3
* GLASSES, DANNY - W7,W5,C5,C3,C1 (Love the mirrored look of these glasses!)
* SHIRT, SHOES, LIPS & HAIR CLIP - R39,R37R35
* EYES -B45,B41
* EYESHADDOW - RV00, RV0000
Hope you enjoyed the card, till next time :)
Shari
Friday, November 4, 2011
Nafiza's Birthday Card
My friend Nafiza is having a birthday on Sunday and I wanted to share her card with you :)
 The supplies I used were;
Here is a pic of the inside:

A close up of the colored mice;
 Copic colors used;
* Big mouse: FACE, EARS, TAIL & BELLY - E11, E00, E000, R20
FUR - C7, C5, C3, C1
* Little mouse: FACE, EARS & TAIL - E11, E00, E000, R20
FUR - W7, W5, W3, W1
* Cupcake wrapper- E49, E47, E44, E43
* Cupcake frosting - R85, R83, R81
* Candle - YR67, YR63, YR61, Y19, Y15, YR18
* Ground - YR67, YR63, YR61, E44, E43, E42, E41
The Make a Wish stamp is an old stamp I had in my cupboard and I stamped it with Versa Mark and embossed it with pink
I hope you enjoyed this post and I hope to be back soon with another card that I made for my friends 30TH Anniversary.
Shari

* A2 Card / envelope
* The cupcake printed paper is from The Greeting Farm
* Expresso Bazzil cardstock
* White lace ribbon (source unknown)
* Dew Drops (6)
* House Mouse Designs stamp
* $1.50 Sentiment stamp from Michaels for the inside
* Spellbinders Ovals & Scallopped Ovals
* Chocolate Brown Catseye Liquid Chalk
* Copic Markers
Here is a pic of the inside:

A close up of the colored mice;

* Big mouse: FACE, EARS, TAIL & BELLY - E11, E00, E000, R20
FUR - C7, C5, C3, C1
* Little mouse: FACE, EARS & TAIL - E11, E00, E000, R20
FUR - W7, W5, W3, W1
* Cupcake wrapper- E49, E47, E44, E43
* Cupcake frosting - R85, R83, R81
* Candle - YR67, YR63, YR61, Y19, Y15, YR18
* Ground - YR67, YR63, YR61, E44, E43, E42, E41
The Make a Wish stamp is an old stamp I had in my cupboard and I stamped it with Versa Mark and embossed it with pink
I hope you enjoyed this post and I hope to be back soon with another card that I made for my friends 30TH Anniversary.
Shari
Friday, October 28, 2011
Jude's 40th Birthday
Hello blogger friends! Just this past weekend was one of my good friends had his 40th Birthday. If you know my friend Jude, you will know that he is a little weird, so this card I am about to show you was PERFECT for him!
 Here is a closer look at the Chicken....
 The stamp I used was from Your Next Stamp (http://www.yournextstamp.com/), and the copic colors I used were;
CHICKEN: C1, C0, R29, R27, R24, YR18, YR16 & YR14
EGGS: E43, E42, E41, E40
STRAW: YR26, YR24, YR23
I used an A2 card and covered it with Orange Bazzil cardstock, then layered on a Creative Memories Photo Mat. I backed the chicken with brown Bazzil cardstock. Everything was liquid chalked with Catseye Chestnut Brown. I also usedmy glaze pen to shine up the eyes.
And the inside (where the comedy is)....
 The sentiment is also fromYour Next Stamp and I mimiced the colors on the inside as well. Boy did we get some laughs from this card at the party :)
Hope you enjoyed this post and I hope to be back soon with some of the Christmas cards that I have made :) Have a great day, ttys :D
Shari


CHICKEN: C1, C0, R29, R27, R24, YR18, YR16 & YR14
EGGS: E43, E42, E41, E40
STRAW: YR26, YR24, YR23
I used an A2 card and covered it with Orange Bazzil cardstock, then layered on a Creative Memories Photo Mat. I backed the chicken with brown Bazzil cardstock. Everything was liquid chalked with Catseye Chestnut Brown. I also usedmy glaze pen to shine up the eyes.
And the inside (where the comedy is)....

Hope you enjoyed this post and I hope to be back soon with some of the Christmas cards that I have made :) Have a great day, ttys :D
Shari
Friday, October 7, 2011
Baby Card For Lucas & Chase
Hello there, it's Friday!! Whoo hoo! Happy Thanksgiving weekend to all the Canadians! The Weather this weekend should be summer-like, so get outside and enjoy before the snow falls!
Today I am going to post a Baby Card that I made for my cousin Richard when he had his baby boy Lucas and also a card I made for my friend Matt when he had his son Chase. Both images are a Stampavie Baby stamp.
First is Lucas'

Using the Square Nestabilities I trimmed the picture in teal and tan Bazzill cardstock and pop-dotted it on top of a strip of brown ribbon, then tied a bow in brown ribbon and glue dotted it on the corner of the baby photo.
I then added 3 brass brads to the bottom of the card to look like the snaps on the Onesie.
Now Chase's card:

I used an A2 card and backed it with a pattern paper from Creative Memories Baby Boy photo mats, used Creative Memories paper ribbon in brown and secured it with two blue safety pins on each end. I added 3 buttons under the sentiment witch is an old stamp I have had for years.
To make the baby pop I cut him out of Spellbinders Nestabilities Label 11 then framed him with Creative Memories paper from the same photo mat pack.
Here is a view of the inside of Chase's card and the envelope;
 The sentiment inside the card is from Creative Memories velum Baby Boy pack, and the crib stamp on the envelope is from the $1.50 bin at Michaels.
Hope you enjoyed today's post (and I hope I covered everything). Enjoy your weekend and I will see you soon:)
Shari
Today I am going to post a Baby Card that I made for my cousin Richard when he had his baby boy Lucas and also a card I made for my friend Matt when he had his son Chase. Both images are a Stampavie Baby stamp.
First is Lucas'

Skin: E01, E00 & E000
Pants: BG78, BG75 & BG72
Shirt: Y17, Y15, Y13 & Y11
Diaper: C01 & C0
Eyes and fingernails: used glaze pen to make them shiny
I drew a Onesie on a folded piece of white cardstock putting the seam at the top of the card. I then traced the pattern on to the printed paper and cut it out with scissors (sorry I do not remember the name of the company for the pattern paper but I purchased it at "Scrapbook Queens" in Mississauga, ON.) Using the Square Nestabilities I trimmed the picture in teal and tan Bazzill cardstock and pop-dotted it on top of a strip of brown ribbon, then tied a bow in brown ribbon and glue dotted it on the corner of the baby photo.
I then added 3 brass brads to the bottom of the card to look like the snaps on the Onesie.
Now Chase's card:

Skin: E01, E00 & E000
Pants: E47, E44, E43 & E42
Shirt: B97, B95, B93 & B91
Diaper: C01 & C0
Eyes and fingernails: used glaze pen to make them shiny
To make the baby pop I cut him out of Spellbinders Nestabilities Label 11 then framed him with Creative Memories paper from the same photo mat pack.
Here is a view of the inside of Chase's card and the envelope;

Hope you enjoyed today's post (and I hope I covered everything). Enjoy your weekend and I will see you soon:)
Shari
Tuesday, October 4, 2011
Thanksgiving Card for Mom & Dad
I would like to start off by saying Thank You to all who commented on my first post welcoming me to blogland! It meant a lot to read your kind words and I look forward to forming great blog friendships with you all!
Now on to my first official "Pink Palace Creation". With the fast approaching Thanksgiving Holiday in Canada this weekend I got into the spirit and made my Mom and Dad a card as they are so graciously cooking a feast for my hubbie and I. The card I made is the first ever easel card that I have created and I have to say it was a success (well in my eyes at least).

I used the Kraftin Kimmie Stamp-Merry (kraftinkimmiestamps.com) and coloured her with my copics:
I printed the sentiment on the inside of the card from the computer and added a leaf button that I removed the button backing from to make the card stand up. The sentiment on the front of the card is from a very old stamp I had and do not know where it is from.
I hope you enjoyed my first blog post as much as I enjoyed sharing it with you!
Shari
Now on to my first official "Pink Palace Creation". With the fast approaching Thanksgiving Holiday in Canada this weekend I got into the spirit and made my Mom and Dad a card as they are so graciously cooking a feast for my hubbie and I. The card I made is the first ever easel card that I have created and I have to say it was a success (well in my eyes at least).

I used the Kraftin Kimmie Stamp-Merry (kraftinkimmiestamps.com) and coloured her with my copics:
Skin: E01, E00 & E00
Hair: E49, E25 & E35
Dress: E43, E42, E41 & E40
Turkey: E17, E15, E13 & a touch of Y26
Oven Mitts and accents on the dress: YR18 & YR15
The card is made from Recollection card stock from Michaels, the accent paper is from Creative Memories, the background square is cut from Basil using the Lacey Squares Nestabilities and the Square Nestabilities.I printed the sentiment on the inside of the card from the computer and added a leaf button that I removed the button backing from to make the card stand up. The sentiment on the front of the card is from a very old stamp I had and do not know where it is from.
I hope you enjoyed my first blog post as much as I enjoyed sharing it with you!
Shari
Subscribe to:
Posts (Atom)