Christmas Countdown:

Showing posts with label Whimsy Stamps. Show all posts

Wednesday, June 10, 2015

Congratulation on your Pregnacy Kelly!

Hello and Surprise it is Wednesday and I have a special post to show to you =)  I am currently on vacation in Michigan waiting to see Dale Jr. win the race on Sunday but today one of my friends from Ohio are meeting us at the tack campground. Recently my friend Kelly announced that she was pregnant so I wanted to show my love and make her a card as well as give her a stuffed Canadian Beaver for the little one on the way =), check it out...

Here is a look at the inside....

Here is a close up of this adorable Baby image from Whimsy Wee Stamps to see the Copic colours used....
 Copic Colours Used:
* Skin:  E11, E00, E000
* Hair:  YR24, YR23, Y21, Y11
* Diaper:  C1, C00, 0
* Diaper Pin:  C3, C1, G00, G000
* Duck Feet and Beak:  YR16, YR14, YR12
* Duck Feathers:  Y17, Y15, Y13, Y11
* Clouds:  B00, BG000, BG0000
* Patches:  G00, G000

I hope you enjoyed today's post, please do come back tomorrow as I will have another post showing another card for my friend Jenn from Ohio too!!

Until Next Time, Keep Crafting!!
Hugs;

Friday, July 18, 2014

For Robyn & Walter's Special Day

Hello and Happy Friday!  Today I have a card to show to you that I made for my Supervisor's Wedding that is next weekend.  I also made the Wedding invitations and many more items for their special day, so when I was creating this card I used the same colours that I used to prepare all their invites etc. so I sure hope that they cherish this card....

Here is a look at the inside of the card....

Here is a close up of the beautiful flower. This is a D-Lite die from Spellbinder called Gerber Daisy - Oh my Goodness I LOVE this die so much and it is so fun to play with!!!
 Supplies Used for this card;
* Spellbinder D-Lite Gerber Daisy
* Embossing Folder for the back ground.  One Crazy Stamper has sooo many fun and playful Embossing folders - check them out here!
* My Favorite Things Die-Namics - check out all the fun shapes and dies at One Crazy Stamper here!
* Outside Sentiment: Whimsy Stamps
* Inside Sentiment: My Favorite Things
* Forever in Time Pearl Gems, Dainty - I am so in love with these Gems as you probably have noticed on my past posts. They are always just the right size and add so much "sparkle" to any project!
* 3D Pop Dots
* Glue Dots
(all supplies listed above can be purchased at One Crazy Stamper!)

I sure hope you enjoyed today post, I would love to hear your thoughts!


Until Next Time, Keep Crafting!
Hugs;

Friday, March 28, 2014

Easter Wishes

Hello and Happy Friday!!!  Next month as you know is Easter so today I have a card to show you that I made for my parents for Easter using the new Whimsy Stamps Think Spring Bunnies....
As you can see on the sign I changed it from "Think Spring" to "Just For You"!  Since it is easy to change out the words it makes this stamp so much more usable!
 

Here is a look at the inside of the card....
 Supplies Used: 
*Image:  Whimsy Stamps - Crissy Armstong's Think Spring Bunnies 
* Copic Xpress It Cardstock 
* Copic Sketch Markers 
* Memento Inks:  Tuxedo Black, Rose Bud & Dandelion 
* Sakura Clear Glaze Pen 
* Sakura Clear Star Pen  
* Best Glue Ever! 
* 3D Pop Dots 
* Pearl Gems - Dainty 
* Cardstock: Stampin' Up Strawberry Slush & Daffodil
* Paper: Doodlebug 6x6 - Flower Box
(All links listed above are for products available at One Crazy Stamper!)

Here is a close up of the adorable little bunnies to see the Copic colours used....
 Copic Colours Used: 
* Bunnies: E49, E47, E44, E43, E42, E41, E40 
* Ear & Nose: RV10, E40 
* Sky: B000, B0000, 0 
* Grass & Leaves: G46, G43, G40 
* Flowers: Queen & Co. Jewels + Dress It Up 
* Butterfly: V17, V12 
* Fly: Sakura Clear Star Pen  
* Sign: Y15,Y13, Y11 

I hope that you enjoyed today's card and maybe I have inspired you to crate an Easter project of your own =)


Until Next Time, Keep Crafting!
Hugs;
 

Friday, March 21, 2014

Your A Star!

Hello and Happy Friday!  I sure hope that you had a great week!  Today I have a super cute Birthday card to show you, hope you like it, I challenged my self not to use patterned paper so I decided to emboss the background image and add die cuts to embellish...
Supplies Used: 
* Image: Whimsy Stamps, Shy Girl 
* Sentiments: Whimsy Stamps, Everyday Moments 
* Zig Wink of Stella Brush, Clear (on top of purple die cut stars) 
* Glossy Accents (on eyes, shoelaces, black on the shoes and outside sentiment) 
* Memento Inks: Tuxedo Black 
* Cricut Cuttlebug Embossing Folder: Skyward Set - Stars
* My Favorite Things Die-Namics: Stacking Stars
* Spellbinders:  Classic Ovals Large & Scalloped Ovals
* Purple Cardstock:  Michaels 8.5x11 Paper Pack
* Black Cardstock:  Basic Black from Stampin' Up

Here is a look at the inside of the card....

 Here is a close up of the beautiful image to see the Copic colours used....
Copic Colours Used: 
* Skin: E11, E00, E000
* Hair: E49, E59, E25, E50
* Eyes: E59, E23
* Purple: V17, V15, V12
* Black: T8, T6, T4


This was such a fun image to work with and I hoped you liked today's card.


Until Next Time, Keep Crafting!
Hugs;
 

Friday, March 14, 2014

My baby Lilli on display!

Hello and Happy Friday!  Wow what a week we had here in Southern Ontario!  I sure hope that you are dug out of all the snow that was dumped on us! 

Today I have an altered item  - a wooden picture frame to show you that I made using the wonderful new stamp set from Whimsy Stamps called, Ciara &Sandy

As soon as I saw this image I thought of me and my baby girl Lilli, so I went ahead and coloured the image like us.  I purchased a raw wood frame and I stained the outside edges with Memento Toffee Crunch and then covered the frame with paper using the Best Glue Ever! to attach the paper to the wood frame and here is what I came up with to put in my living room on display....
Supplies Used: 
* Image: Whimsy StampsCiara &Sandy 
* Glossy Accents 
* Your Next Stamp Fishtail Banner Dies  
* Your Next Stamp Letter Board Die
* Bazzill 12x12 Champagne 
* Memento Inks: Tuxedo Black, Toffee Crunch & Rhubarb Stalk 
* Copic Sketch Markers 
* Copic Xpress It Cardstock 
* Pearls 
* Squishy Scissors (LOVE these scissors!!!) 
* Best Glue Ever! 
* Xyron 
* Frame: from Michaels $1.50 bin
* Bone Paper Clip from my stash
* Patterned Paper: from my stash
(All links listed above are for products available to purchase at One Crazy Stamper!!)

Here are some closeups to see the sentiments and Copic colours used better, as you can see I have added Glossy Accents to the "Best Hugger Award" circle, the girls glasses, the tongue, dogs nose & eyes....
 
 
Copic Clours Used: 
* Skin: E11, E00, E000, E0000
* Hair: E34, YR24, Y26, Y21, Y11
* Reds: R39, R37, R35 * Blues: B99, B97, B95 
* Greys: C3, C1, C0
* Dog: R22, R21, R20, E41, E50, E40, 0
* Best Hugger: E43, E42, R39, R37, R35 

I sure hope that you enjoyed today project!
 
 
Until Next Time, Keep Crafting!
Hugs;
 

Friday, March 7, 2014

Whimsy Stamps - Little Princess

Hello and Happy Friday!!!

Today I have a card to show you that is made for Royalty using Whimsy's new release called Little Princess and also showing off the new Crown Die and Stamp Set....

Here is a look at the inside of the card....
Supplies Used:
* Image: Whimsy Stamps, Little Princess 
* Outside Sentiment: Whimsy Stamps, Fairy Tale Dreams 
* Whimsy Die, Crown Die 
* Copic Sketch Markers 
* Copic Xpress It Cardstock 
* Fairy Dust Glitter - Sugar Shimmer 
* 3D Pop Dots 
* Memento Ink: Tuxedo Black 
*  Sakura Clear Glaze Pen 
* Patterned Paper:  My Minds Eye 6x6 Lost & Found - Blush
* Cardstock:  Stampin' Up Basic Black
* Spellbinders:  Fleur De Lis Rectangles
(All Links Listed above are for products available to purchase at One Crazy Stamper!)

Here is a close up of the Princess to see the Copic colours used....
Copic Colours Used: 
* Skin:  E11, E00, E000 
* Eyes:  B37, B34 
* Lips:  R85, R81  
* Hair:  E29, E25, E31 
* Dress & Bows:  R56, R85, R83, R81 + Paper Pieced Bodice 
* Ruffles:  RV000 + Fairy Glitter Dust 
*  Crown Die:  RV000 
* Bird: B14, B12, Y15

I hope that you enjoyed today card, I hope that I have inspired you to enter a project into this months Anything Goes Challenge over at One Crazy Stamper!!

Until Next Time, Keep Crafting!
Hugs;
 

Saturday, March 1, 2014

Happy Birthday Cathie!

Hello and welcome!  Today is March 1st which means we are starting a new challenge over at One Crazy Stamper!  This month the company that we aill be showcasing is Whimsy Stamps and this months theme for the challenge is: ANYTHING GOES using a WHIMSY Stamp. 

Here is my inspiration card for ya that I made for my Sister-in-Law Cathie for her Birthday....
 
Here is a look at the inside of the card....
Supplies: 
* Memento Inks: Tuxedo Black & Rhubarb Stalk 
* Whimsy Stamps Everyday Moments Sentiments 
* Your Next Stamp Whatnot Sentiments One 
* My Favorite Things Flower Die-Namics
* Spellbinders: Long Classic Rectangle & Long Scalloped Rectangle
* Lace on a Roll: Michaels Recollections
* Large Clear Goosebump Gem: Michaels Recollection
* ColorBox Chalk: Lipstick Red
* Paper: EP 6x6 Paper Pad: Yours Truly
* Cardstock: Stampin' Up Cherry Cobbler 
(All links listed above are for products available to purchase at One Crazy Stamper)
 
Here is a close up to see the Sweet Flower Girl and the Copic colours used....
Copic colours used:
* Skin:  E11, E00, E000
* Reds:  R39, R37, R35
* White:  C3, C1, C0, 0
* Hair:  E35, YR24, E33, E31
* Eyes:  B23, B21, Glossy Accents
* Flower:  R39, R35, G46, G43, Glossy Accents

Well that is my inspiration card for today, I hope that you will pull out one of your Whimsy Stamps and create a project for this month's Challenge.  If you do not own any Whimsy Stamps check out One Crazy Stamper here to see what is available, sooooo many cook stamps to choose from!
 
 
Until Next Time, Keep Crafting!
Hugs;
 

Friday, November 29, 2013

Christmas Hamster - May your Holiday Sparkle!!

Hello Happy Friday!!!  Today is the last Friday of the month and the last day you have to enter your project into this months Christmas Challenge over at One Crazy Stamper!  Today I have a cute little Hamster Christmas card to show you...
 Do you see that fancy bow at the top of the card?  You will never guess how I made it!  The whole bow was made using the We R Memory Keepers Envelope Punch Board!!!  If you do not have this tool it is a MUST and should be added to your Christmas List!!!  There is so many other projects you can make using this amazing tool and I will share some of these ideas with you soon on my blog and some of my Friday posts here at OCS!  Are you intrigued?  Keep checking in so you don't miss out on some of these fabulous ideas =)

Supplies used: 
* Image: Whimsy Wee Stamps, Xmas Hamster 
* Prima - Chalk Edger Ladybug 
* Memento Inks: Tuxedo Black & Cottage Ivy 
* Gelly Roll Clear Glaze Pen 
* 3D Pop Dots 
* Copic Xpress It Cardstock 
* Copic Sketch Markers 
* WR Memory Keepers - Envelope Punch Board
* Patterned Paper: Wild Rose 6x6 Paper Pack, Annabelle's Christmas
* Green Cardstock:  Stampin' Up Garden Green
* Spellbinders:  Classic Ovals & Scalloped Ovals
* Sentiment: Poppy Cling, Holiday Sparkle

Here is a close up look at the adorable little Hamster on the ornament to see the Copic colours used....
 Copic Colours used: 
* Hamster: E13, E11, E00, E000 + E49, E47, E44, E42 
* Inside Ears:  R20, E00 
* Nose: E47, E44 
* Red: R46,R29, R24, R22 
* Greens: G46, G43, G40 
* Whites: N2, N0 
* Silver: Silver Metallic Pen 
* Glaze Pen on: Eyes, Nose, Inside Ears, Ornament Topper, Green Stripes on Ornament

I hope that you enjoyed today's post and will submit your project today into this month's Christmas Challenge at One Crazy Stamper =)


Until Next Time, Keep Crafting & Merry Christmas!!
Hugs;
 

Friday, October 25, 2013

2 Months Till Christmas Hop!

Hello and Happy Friday!  Since today is the 25th of the month that means that it is only 2 months until Christmas and time for another Fun hop with our fabulously talented Christmas Design Team ladies!

This month our theme to follow is a photo inspiration which I will share with you after I show you my two Christmas cards I have made for you.  I am the first stop on our fun little hop so lets get started!  I will have a full hop list at the end of my post for you to follow =)

For my first card I not only have an adorable image to show you that I am very proud of how the colouring turned out, as well as a technique that you may not have tried yet and is easy to incorporate into your card making and scrapbooking - Glitter Ritz!
On this card all the red accents you see (the scalloped circle and the outline of the sentiment) were all done using Glitter Ritz to help make the card sparkle!

Here is a look at the inside of the card...
Supplies Used: 
* Image: Whimsy Wee Stamps, Berry 
* Memento Inks:  Tuxedo Black & Cottage Ivy
* Memory Box Cling Stamps, Merry Christmas Flourish  
* Spellbinders:  Classic Scalloped Circles Lg & Standard Circles Lg
* White Sparkle Paper: DCWV Christmas Glitter Mattstack
* Outside Sentiment:  My Favorite Things, Sparkling Season
* Green Cardstock:  Michaels 8.5x11 Paper Pack
(All links listed below are products available to purchase at One Crazy Stamper!!)
 
Here is a close up of the image to see the Copic colours used....
Copic Colours Used: 
* Skin:  E11,E00, E000 
* Hair:  E37, YR24, Y26, Y21, E50 
* Greens:  G28, G24, G21, G20 
* Kitty:  E37, E35, E34, E31, E30,R21, R20 
* Red:  R89, R39, R37, R35 
* Whites:  C3, C1, C00 + Fairy Dust Sugar Shimmer Glitter 

Here is an angled view to see the glittered areas a little better and to see the Glitter Ritz effect on the scalloped boarder....


Here is my 2nd card I created to show to you....
 
Here is a look at the inside of the card....
 Supplies Used:
* Image:  My Favorite Things, You Shine
* Memento Inks:  Tuxedo Black & Rhubarb Stalk
* Clear Gems
* Paper:  Wild Rose Studio 6x6 Annabelle's Christmas
* Cardstock: Stampin Up Cherry Cobbler
* Outside Sentiment:  PrintWorks, Deck the Halls
* Inside Sentiment: House Mouse Designs Christmas Clear Stamp Set
* Spellbinder: Petite Scalloped Ovals Lg
 
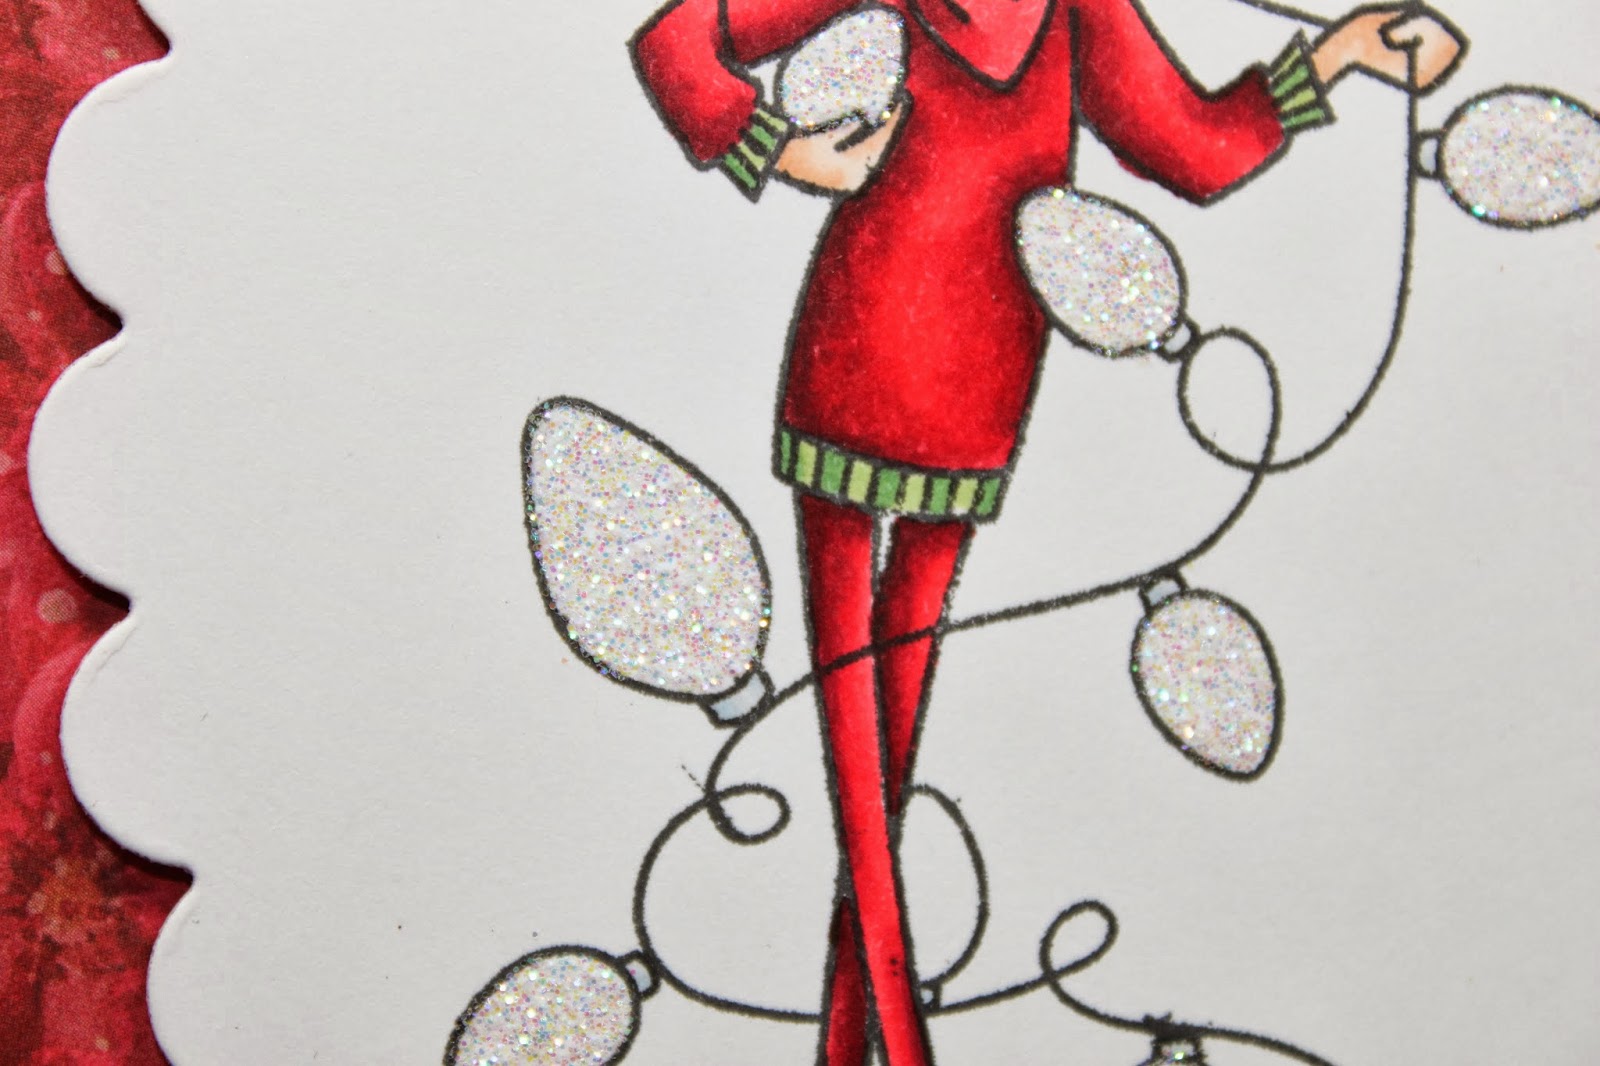
Here is a close up of the image to show you the Copic colours used....
 Copic Colours Used:
* Skin:  E11, E00, E000
* Hair:  E29, E27, E23, E50
* Hairband:  R39, R35, Y19,Y15, Y13
* Sweater, Pants & Shoes:  R89, R59, R37, R35
* Sweater Cuffs and Band:  G46, G43
* Earrings:  R37
* Light bulbs:  C3, C1, C00 + Fairy Dust Sugar Shimmer Glitter

Here is a close up of the light bulbs to show you the Fairy Dust Sugar Shimmer Glitter....

Can you guess the inspiration for these cards, well wonder not, here is the photo I based my cards off of where I pulled the reds, greens and whites from as well as the lights (glitter)....

Here is the full hop order for this month in case you get lost along the way....
Shari~ You are Here!
 

So with only 2 months till Christmas, I hope I have I inspired you to get started on your Christmas cards too?  Enjoy the hop and see you again next month!


Until Next Time, Keep Crafting & MERRY CHRISTMAS!
Hugs;

Friday, October 4, 2013

Have a FRIGHTFULLY Fun Birthday!

Hello and Happy FRIDAY!  Today I have a fun card to show you using a Halloween stamp for a Birthday card!  This card was so fun to create and colour, check it out....

 Aren't these little bats so darn adorable??!!  I set this scene for a night look in the pumpkin patch and I just love how it turned out!  How can anyone be afraid of these adorable Vampire bats?
 
Here is a look at the inside of the card....
Supplies Used: 
* Image: Whimsy Wee Stamps, Batty Boo 
* Copic Xpress It Card Stock 
* Copic Sketch Markers 
* Memento Inks:  Tuxedo Black, London Fog & Bamboo Leaves 
* 3D Pop Dots 
* My Favorite Things Die-Namics:  Woodgrain Fence
* Fiskers Grass Boarder Punch
* Cardstock:  Joann's, Stampin Up & Michaels
* Paper:  BoBunny 6x6 Paper Pad, Apple Cider
* Outside Sentiment:  Kraftin Kimmie Stamps, Halloween Lulu & Birthday Lulu
* Moon/Sun Stamp:  Stacy Stamps
* Platinum Planet Memento Dew Drop Ink
* Inside Sentiment:  Starstamps
(All Links listed above can be purchased at One Crazy Stamper!)

Here is a side view to see the 3D effect. As you can see I only "popped" the top portion of the image and attached the bottom of the image flush with the grass....
 
Here is a close up of the adorable image to see the Copic colours used....
Copic Colours used: 
* Pumpkin: YR18, YR16, YR14, YR12, YR01, YR000 
* Greenery & Ground:  YG67, E44, YG63, YG61 
* Pumpkin Eyes and Nose:  YR23, YR21, YR21, Y15 
* Bat Bodies:  W9, W7, W5, W3 
* Bat Ears:  W3, W1, R11 
* Cape (Wings):  N8, N6, N4, N2 
* Bowtie & Shirt:  R89, R39, R37, R35, N2, N0

I sure hope you enjoyed today's post as much as I enjoyed making it to show to you.  If you would like to see more on this card, please visit my blog here =)

I hope that my card may have inspired you to enter into this month's challenge over at One Crazy Stamper for our Thanksgiving/Fall Theme.  Have a fantastic Friday and I will see you again next week. 


Until Next Time, Keep Crafting!
Hugs;
 

Tuesday, October 1, 2013

OCS October Challenge - Thanksgiving / Autumn

Hello and Happy 1st of October!  Since it is the first day of the month that means there is a new challenge starting over at One Crazy Stamper and the challenge this month is: Thanksgiving / Autumn!

I have made an Autumn Birthday card to show to you today in hopes to inspire you to join in this month for your chance to win a fabulous prize!

 
Here is a look at the inside of the card....
 Supplies Used: 
* Image:  Whimsy Wee Stamps - Autumn Happiness
* Outside Sentiment:  Whimsy Raindrop Echo Designs Stamps - Celebration Pennants
*Inside Sentiment:  Your Next Stamp - Whatnot Sentiments One
Copic Xpress It Paper
* Copic Markers (colours used listed below)
* Memento Inks: Tuxedo Black & Morocco
* Paper:  BoBunny 6x6 Paper Pad - Apple Cider

* Cardstock:  Stampin Up -Peach Parfait & Lucky Limeade
* Glossy Accents
* Ribbon:  Brown Sheer 1/2" from local $ Store

Here is a close up of this cute little baby dragon to see the Copic colours used....
Copic Colours Used:
* Dragon:  E89, E87, E84, E53, E51, E50
* Eyes:  E29, E25 + Glossy Accents
* Tongue:  R22, R21 + Glossy Accents
* Greenery:  G46, E44, G43, E42, G40
* Leaves & Berries:  R29, R24, R22, YR27, YR24, YR23, YR21, YR20,YR18, YR16, YR14, YR12, E44, E43, E42 + Glossy Accents on the Berries
 
I hope that you enjoyed today's Autumn Birthday card and that I may have inspired you to create a project to enter in to this months Challenge at One Crazy Stamper =)
 
 
Until Next Time, Keep Crafting!
Big Hugs;
Related Posts Plugin for WordPress, Blogger...