Christmas Countdown:

Friday, June 26, 2015

OCS June Tutorial- Shrink Plastic

Hello and Happy Friday!!!  Today I have a special Tutorial to share with you on how to use "Shrink Plastic" on your cards and scrapbook pages. Have you ever looked at someone's project and saw them use shrink plastic and wonder how they do that, well you can find out here today!!! You can choose to cut the Shrink Plastic using scissors, with your die cut machine and your dies or you can stamp and image using StazOn ink and cut out and colour using your Copic Sketch Markers.

Today you will see three completed examples, one I cut the plastic with a Spellbinder shape,  one I just stamped and cut out with scissors and the other one I stamped, cut and coloured with my Copic Sketch markers! Check it out...

To Start off you will need to have Inkssentials Shrink Plastic by Ranger....
Inkssentials Shrink Plastic Sheets P29809
 
And below you will see the other supplies I used for this project....
 Supplies Used:
* Inkssentials Shrink Plastic by Ranger
* StazOn Timber Brown Ink
* Memento Ink: Tuxedo Black
* Distress Ink: Broken China
* Copic Xpress It Cardstock
* Copic Sketch Markers
* Image:  High Hopes Stamps, Bob Hooked a Big One
* Sentiments:  High Hopes Stamps, Bold Happy Birthday & Keep Clam & Fish On
* Mini Blending Tool
* 1/4" Hole Punch
* Spellbinders Die - Pearl Effects
* Sizzix Waves Embossing Folder
* Paper - Bella Blvd Camp Out 12x12, Jump In The Lake
* Twine
* Button
* Red Cardstock
* White Cardstock
* Craft Heat Gun
* Scissors
* "Pokey" Tool
* Glossy Accents

Now that you have your tools you can get started!  The first example I am going to show you is how to use your Copic Sketch Markers to colour on Shrink Plastic. When choosing an image you plan to stamp and colour you first need to sand one side of the plastic with sand paper in a cross hatch pattern as shown in the photo below, can you see the scratch marks?...
 Once you have sanded one side of the plastic, turn over your piece and stamp your image on the smooth side using StazOn ink - I have chosen to stamp just the fish from the image I am using on the card you will see later. Cut out your image using scissors or a die shape.  If you wish to hang your plastic piece from twine, ribbon, etc. you will need to punch a 1/4 hole before you colour and shrink.  Once the ink has dried, turn over your piece and colour on the sanded side using your Copic Sketch Markers, see photo below of mine coloured before I shrink it, I chose to use the dotted technique to make scale line texture on the fish....

In the next example I stamped the High Hopes Stamps Sentiment "Keep Calm & Fish On" with StazOn ink and have cut out with scissors.  ....
 As you can see the image does not look perfect but just wait all will work out perfect!!!

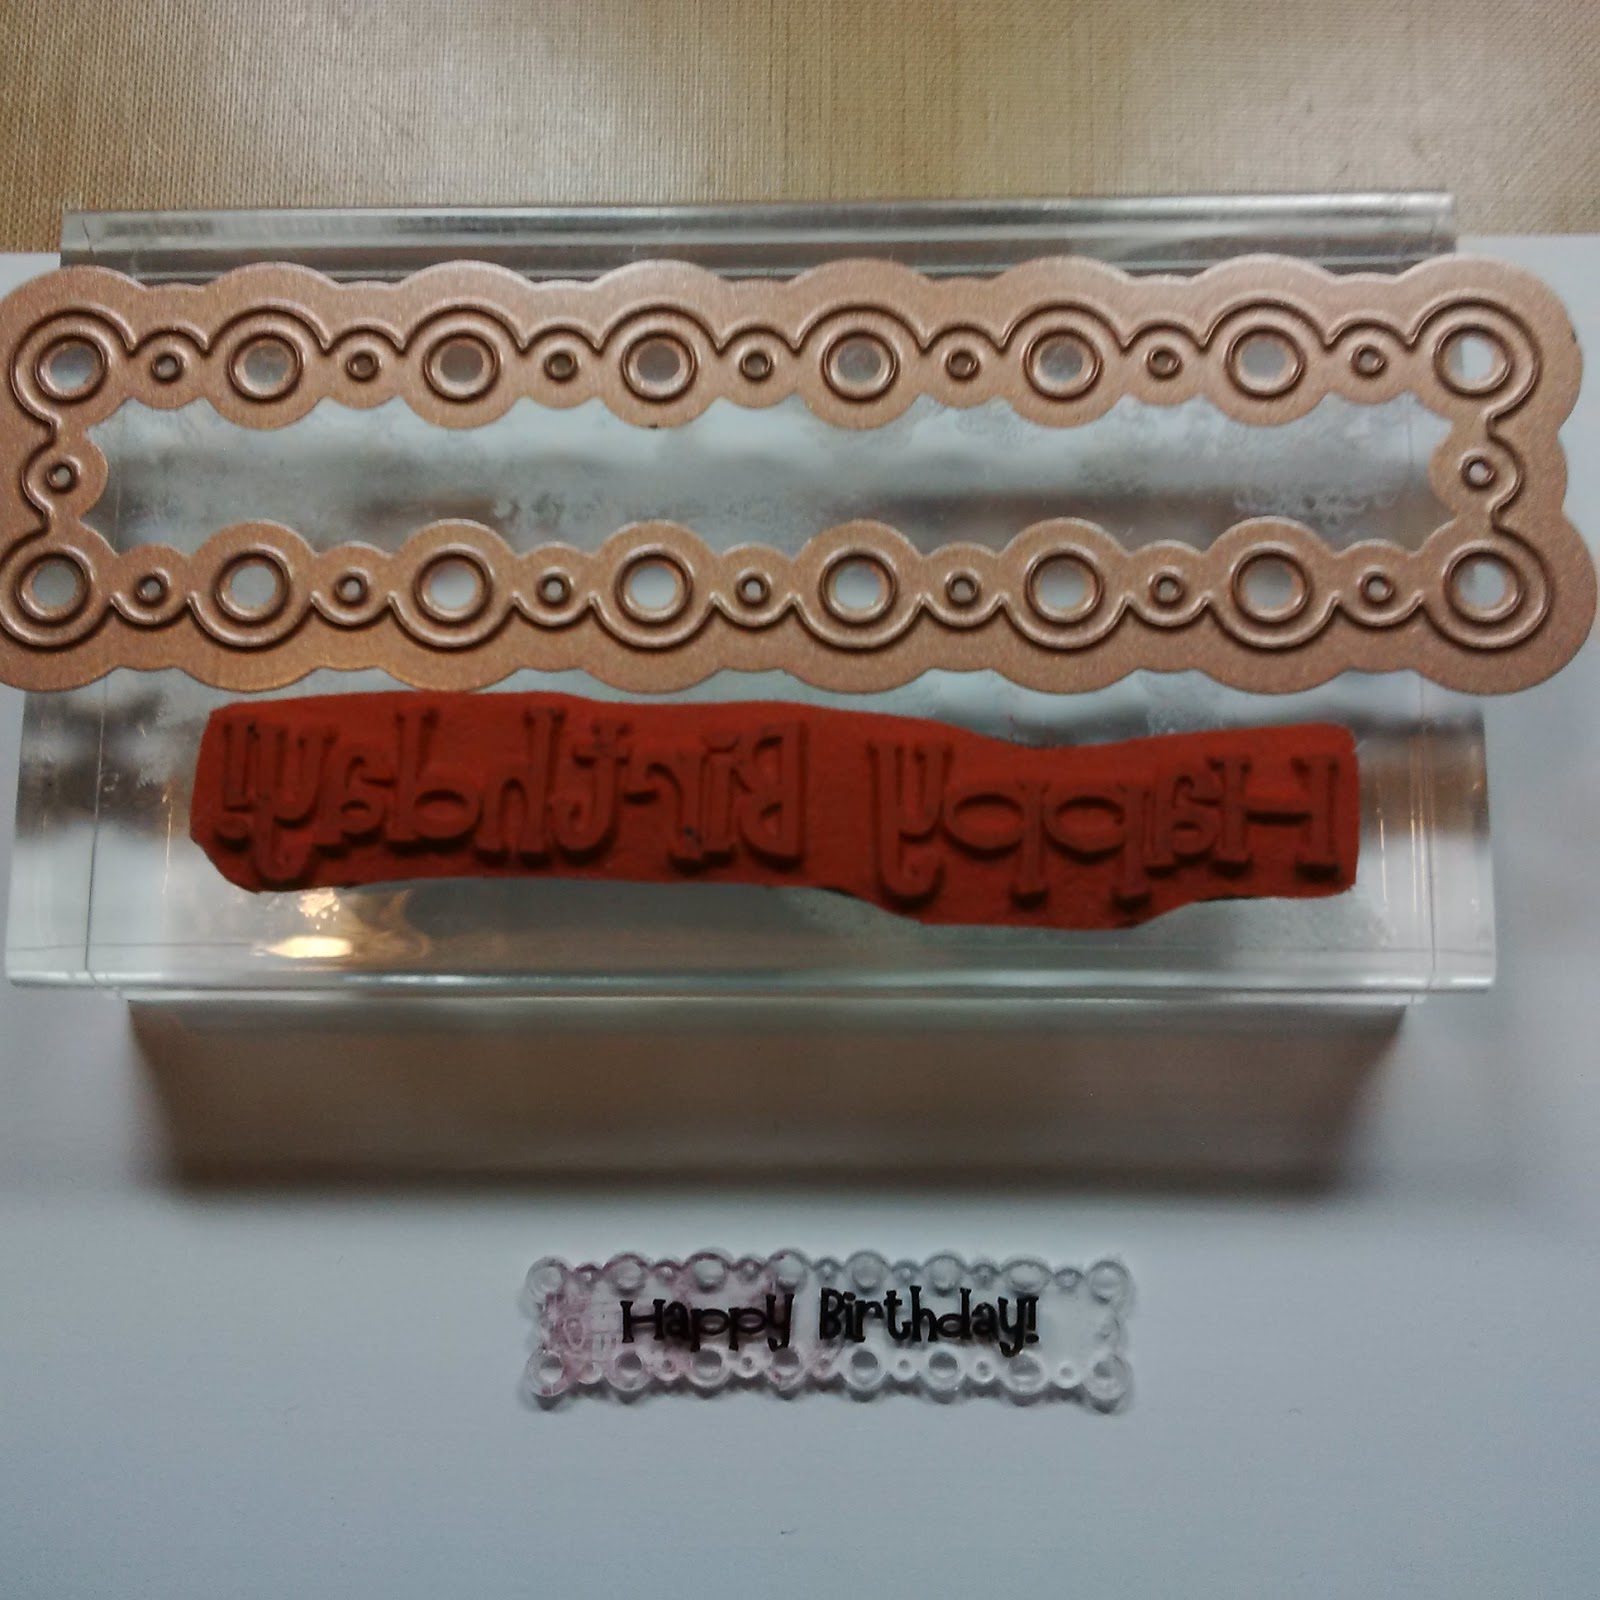
In the last example I have cut out the plastic using my Spellbinder Pearl Effects Die then stamped on the High Hopes Stamps Bold Happy Birthday sentiment using StazOn ink....

Now that you have prepared all your pieces we are ready to "shrink" each piece to 45% of it's size!  All you need now is your "pokey" tool to hold your piece and your Craft heat gun.  Fan your heat gun over your plastic piece and once it starts to heat up it will start to shrink.  You will find that the plastic will start to curl into a ball - don't be afraid this is suppose to happen, see photo below....
 To straighten the "curl" and complete the shrinking process just turn over your piece and heat.  Your piece will take on the right look now.  Turn your piece back over to have the front forward and heat it up a tiny bit more then take your acrylic stamp block and press it on top of your plastic piece to make sure it is flat and straight.  Super easy right?? Now if you have other prepped, complete the same process and shrink =)

Below you can see some pictures of the original size vs. the 45% shrunk pieces to see how cool this really is!....


Here are all 3 pieces completed....
I decided after I took this photo that my Happy Birthday piece did not show up on the card the way I wanted it to so I decided after to take my R29 Copic Sketch Marker and just colour the back of the piece to have the red show through and make it pop off the card
 
Here is my completed card with my new "Plastic Embellishments" added....

Here is a close up of Bob to see the Copic colours used....
 Copic Colours used:
* Skin: E11, E00, E000
* Hair:  T4, T2, T0
* Hat:  E42, E41, E40, B99, B97, B95, T4, R24+ Glossy Accents
* Glasses:  R29, R24, R22, T6, T4 + Glossy Accents
* Shirt:  R29, R24, R22
* Pants:  B99, B97,B95
* Boat:  R29, R24, R22, T4,T2,T0
* Fish:  BG99, BG95, BG93, BG91
* Fishing Rod:  E42, E41, E40, T4, T2, T0
* Lure:  R29, R24, R22 + Glossy Accents
* Water:  B12, B00, B0000

Well I sure do hope that you enjoyed today's tutorial and maybe I have inspired you to give this "easy" technique a try!!!!


Until Next Time, Keep Crafting!
Hugs;

Friday, June 19, 2015

Happy Father's Day to my Daddy!

Hello and Happy Friday!  As you are aware on Sunday it is Father's Day so today I am going to share with you the special card that I made for my Daddy....
 
 Here is a look at the inside....
 Supplies Used:
* Image: Stampendous House Mouse Stamps - Tee Time
* Sentiments outside and In:  Your Next Stamp
* Copic Xpress It Cardstock
* Copic Sketch Markers
* Glossy Accents (eyes and golf ball)
* Memento Ink: Tuxedo Black & Toffee Crunch
* Mini Blending Tool
(All above listed supplies can be purchased at www.onecrazystamper.com)
* Paper:  Fancy Pants 6x6 Paper Pad - Little Sport
* Cardstock:  Stampin Up Garden Green
* Ribbon:  Local $ Store find
* Dies:  My Creative Time Curley Label & Stitched Curly Label

Here is a close up of the fun image to show you the Copic colours used....
 Copic Colours Used:
* Skin:  E21, E51, E50
* Fur:  E74, E71, E70
* Ground:  E71, E70, 0
* Red:   R29, R24, R22
* Blue:  B99, B97, B95
* Green:  G28, G24, G21
* Brown:  E35, E33, E31
* Grey/White:  C3, C1, 00

I hope that you enjoyed today's card and I hope that everyone has a wonderful Father's Day with your Dad or Husbands =)

 
Until Next Time, Keep Crafting!!!
Hugs;

Friday, June 12, 2015

High Hopes Stamps - Julie's Dream

Hello and Happy Friday!  As you are reading this post I am on vacation in Michigan for the Nascar race.  Today I have another High Hopes Stamps Fairy card to share with you....
 Supplies Used:
* Image:  High Hopes Stamps, Julie's Dream
* Sentiment:  High Hopes Stamps
* Copic Xpress It cardstock
* Copic Sketch Markers
* Wink of Stella: Clear
* Memento Inks:  Tuxedo Black & Lilac Posies
* 3D Pop Dots
* Glossy Accents
* Gems:  Forever In Time - Tropical
(All above listed supplies can be purchased at www.onecrazystamper.com)
* Paper:  Little Yellow Bicycle - Fern & Forest
* Cardstock:  Michaels 8.5x11 paper packs

Here is a close up of the beautiful Julie to see the Copic colours used....
 Copic Colours Used:
* Skin:  E11, E00, E000
* Hair:  E43, E33, E42, E40, E000
* Eyes:  B14, B00
* Lips:  RV63
* Fuchsia:  RV69, RV66, RV63
* Green:  G16, G14, G12
* Pink:  R83, R81, RV10
* Brown:  E29, E27, E25, E42

I hope you enjoyed today's card!

 
Until Next Time, Keep Crafting!!!
Hugs;

Thursday, June 11, 2015

Congratulations on your Engagement Jennifer!!

Hello!  Surprise, it is Thursday and I have another bonus post for you. Today while on vacation in Michigan at Nascar I am meeting up with my friend Jennifer from Ohio whom just recently got Engaged so I thought I would make her a card to celebrate....
 
 Here is a look at the inside of the card....

Here is a close up of the image from Stampin Bella to show you the Copic colours used....
Copic Colours Used:
* Skin:  E11,E00, E000
* Bracelet:  BV04, BV02, BV01
* Nails:  RV34, RV32
* Ring:  C3, BG000
 
I hope that you enjoyed the bonus posts this week!  Be sure to come back tomorrow to see my weekly Friday post for One Crazy Stamper!
 
Until Next Time, Keep Crafting!!!
Hugs;

Wednesday, June 10, 2015

Congratulation on your Pregnacy Kelly!

Hello and Surprise it is Wednesday and I have a special post to show to you =)  I am currently on vacation in Michigan waiting to see Dale Jr. win the race on Sunday but today one of my friends from Ohio are meeting us at the tack campground. Recently my friend Kelly announced that she was pregnant so I wanted to show my love and make her a card as well as give her a stuffed Canadian Beaver for the little one on the way =), check it out...

Here is a look at the inside....

Here is a close up of this adorable Baby image from Whimsy Wee Stamps to see the Copic colours used....
 Copic Colours Used:
* Skin:  E11, E00, E000
* Hair:  YR24, YR23, Y21, Y11
* Diaper:  C1, C00, 0
* Diaper Pin:  C3, C1, G00, G000
* Duck Feet and Beak:  YR16, YR14, YR12
* Duck Feathers:  Y17, Y15, Y13, Y11
* Clouds:  B00, BG000, BG0000
* Patches:  G00, G000

I hope you enjoyed today's post, please do come back tomorrow as I will have another post showing another card for my friend Jenn from Ohio too!!

Until Next Time, Keep Crafting!!
Hugs;

Friday, June 5, 2015

High Hopes Stamps - Julie's Flight

Hello and Happy Friday!  Today I have a fun Fairy card to show you from High Hopes Stamps....
Supplies Used:
* Image:  High Hopes Stamps, Julie's Flight
* Sentiment: High Hopes Stamps
* Copic Xpress It Cardstock
* Copic Sketch Markers
* Memento Inks:  Tuxedo Black & Rose Bud
* Wink Of Stella - Clear
* Glossy Accents
* Clear Gems
* Corner Rounder
(All above listed supplies can be purchased at www.onecrazystamper.com)
* Cardstock: Stampin Up Daffodil and Rose Red

Here is a close up of Julie to see the Copic colours used....
 Copic Colours Used:
* Skin:  E11, E00, E000
* Hair:  E29, E25, E23, E21
* Eyes:  B14, B12
* Pink:  R85,R83, R81
* Yellow:  YR23, YR21,YR20
* Butterfly Body:  E25

I hope that you enjoyed today's card and we would love to see your creation entered into this months Anything Goes challenge!
 
 
Until Next Time, Keep Crafting!!!
Hugs;

Monday, June 1, 2015

OCS June Callenge - Anything Goes!

Hello and Happy 1st of June!  Since it is the first of the month as you know it marks a new challenge over at One Crazy Stamper and the theme is Anything Goes! 

Here is my June calendar page showcasing one of the recent High Hopes Stamps released image, Julie's Dream House....
June Calendar Supplies: 
* Sentiment: High Hopes Stamps, Believe 
* Prima Paper Flowers 
(All above listed supplies can be purchased at www.onecrazystamper.com) 
* Dies: Crealies Cloud Die & Spellbinders Classic Circle and Scalloped Circle 
* Ink: Stampin Up Marina Mist
* Cardstock: Stampin Up Marina Mist & Bashful Blue
 
Here is a close up of this fun image to show you the Copic colours used....
Copic Colours Used: 
* Trunk:  E25, E33, E31, E30
* Top:  R29, R27, R24, R22, C3, C1, C00
* Door:  B99,B97, B95
* Window/Door Frame & Curtains:  R29, R24, R22
* Light in Windows:  Y8, Y4, Y00
* Butterfly:  B97, B95, B93, YG67, YG17, YG03
* Flowers:  B97, B95, B93, Y8, Y4,Y00, YR16, YR14, YR12, YG67,YG17

I hope that you enjoyed this month calendar page and I also hope to see your creation entered into this month`s challenge!!


Until Next Time, Keep Crafting!
Hugs;
 
Related Posts Plugin for WordPress, Blogger...