Christmas Countdown:

Thursday, April 5, 2012

DTBST#119 - Go For Broke! (Bubble Bath)

Happy Thursday everyone! Today is my first post as a Design Team member for Sassy Studio Designs.  I have joined their team for their weekly Dare to Be Sassy Thurdsday challenges.

Did you know April 5th is "Go For Broke Day"?  This week we've got a fun Dare to Be Sassy Thursday challenge for you over at Sassy Studio Designs, it's to make an extravagant card, using more than one patterned paper and lots of embellishments (especially some of those you've been hoarding), so go for broke and use up your embellishments! I hope you will join in the fun this week.

Here is my card that I made to show you using all brown tones...to see any of the pictures larger, just click on the image!.....

Here is a side view to show you the depth of the layers I added......
SUPPLIES USED:
* Image:  Sassy Studio Designs Bubble Bath (retired image, but many other georgeous images in the store)
* Copic X-Press Paper / Laser Printer
* Copic Markers (Colours used listed below)
* 5x6.5 Card & Envelope
* 1st Pattern Paper (flowers):  My Minds Eye, Paris & Co. 6x6 Paper Pack
* 2nd Pattern Paper:  Basic Grey, Little Black Dress 6x6 Paper Pack
* Brown cardstock from Michaels Recollections 8.5x11 Paper Pack
* Creative Memories 3/4" Square Punch to make flag ends on sentiment
* Ink:  Close to My Heart, Chocolate for sentiments and around the edges of papers and card
* Outside Sentiment: Kraftin Kimmie Stamps, from Bridget stamp set
* Inside Sentiment: $1.50 bin at Michaels
* Stripped Paperclip: from local Liquidation center in the office supplies section
* Close to My Heart Chocolate and Mocha Pearls Pack
* Brown Sheer Ribbon from my local $ Store
* Cuttlebug machine & Cuttlebug 5x7 Polka Dot Embossing Folder
* Liquid Accents on some of the bubbles and the puddle for dimension
* 3D Pop Dots
* ATG

Here is a picture of the inside of the card, I made it so that you can place a gift card inside a pocket as shown in the picture  =)...

 Here is a close up of the coloured Bubble Bath image.....
COPIC COLOURS USED:
* Skin:  E11, E00, E000
* Hair:  E49, E47, E44, E43
* Lips:  R83, R81
* Headband:  E42, E41, E40
* Tub:  E49, E47, E44, E42, E41,E40
* Bubbles:  BV31, 0
* Ground:  E40

I would like to enter this card into the following challenges:
* Simon Says - Use your Favorite Tool: I used a couple, my Copics and my ATG!
* Whimsy Stamps Inspirations Challenge #33  - Use Ribbon
* Moving Along With The Time Challenge #143 - VaVaVaVoom
* Stamp with Fun Challenge #155 - NO Easter Card
* Papertake Weekly Challenge - Anything goes with Option of Monotone Colour (I used Browns)
* Fashionista Challenge - Anything goes for GIRLS

I had so much fun making this card for my first DT challenge, and it turned out more beautiful than I expected, I wish you could see in in real life as the pictures do not do it justice.

I hope that you will pop over to the Sassy Studio Designs Blog to see what my other talented DT memebers created for this challenge, and maybe inspire you to join in the challenge this week.

Until next time, keep crafting!
Shari

Monday, April 2, 2012

Very Exciting News!

I just wanted to share some very exciting news with you.......I have been accepted onto the Sassy Studio Designs Team!  Whoo hoo!!  I am just SO excited to be a part of this team, and as you can see from some of my past posts I AM TOTALLY IN LOVE with Sassy Studio Designs digi images!!  
If  you've never been on the Sassy Studio Designs blog, just click and pop over to check it out, and you will see what I mean about falling in love with these images. Once you get into the blog you can click on the "Lets Shop" banner to go to the digi store and see the amazing images available.

I will be back with more soon, I hope you will join me in this new adventure =)

Until then, keep craftin'!
Shari

Sunday, March 25, 2012

"9 Months Till Christmas!" Blog Hop


It is the 25th of the month and that means that it is time for another Christmas card blog hop!  This month it is not only Heather and myself showing you two Christmas cards each, but a total of 5 blogs to visit in this fun hop! In each blog you will see one card that is made using a colouring meduim and a second card made using a die cut of some sort.

If you have come by here just by chance, the good new is you are at the beginning of the hop and a list of the blogs that you can visit will show below my cards that I have made to show to you, so you can continue on from here =)

Here are the two Christmas cards I have made for this month.....now I have a total of 4 cards already made to give out in December, whoo hoo!!.....

Here is a picture of my coloured Christmas card......
 SUPPLIES USED:
* 4 x 5.5 cardsand envelope
* Deacon & Eva HO HO digi stamp from Bugaboo Stamps
* Copic X-press paper
* Copic Markers (colourslisted below close up image)
* Merry Christmas sentiment from Michael's $1.50 bin
* Paterned paper from: My Minds Eye "12 Days of Christmas" 6x6 paper pad
* White & Green cardstock from my stash
* Ranger Liquid Pearls in White Opal
* Star Dust Stickles
* Sakura Gellyroll Redstar, Limestar & Clearstar pens
* Close to My Heart Pondarosa Pine Ink
* Spellbinders Nestabilities Labels 8
* 3D pop dots
* ATG

Here is a close up of the Copic colours used....
 COPIC COLOURS USED:
* SKIN:  E11, E00, E000
* EVA'S HAIR:  E25, E31, E50
* EVA'S CLOTHES:  R59, R39, R37,R35
* EVA'S SHOES:  Sakura Gellyroll Redstar & Clearstar pens
* EVA'S FUR AND POMPOM:  Star Dust Stickles
* DEACON'S HAIR:  E49, E47, E44
* DEACON'S CLOTHES:  G29, G46, G07, YR24, YR21, C00
* DEACON'S FUR ON HAT: Star Dust Stickles
* DEACON'S BELLS: YR24, YR23, YR21
* PRESENT:  Sakura Gellyroll Redstar, Limestar & Clearstar pens (it's really sparkly IRL!)
* HO HO:  R59, R39, R37, R35, G29, G46, G07
* SNOWFLAKES:  Ranger Liquid Pearls, White Opal & Stickles Star Dust

Here is a picture of the inside of the card......

And now for the Die Cut card using my Cruict Machine......
SUPPLIES USED:
* 4 x 5.5 cardsand envelope
* Cricut Jolly Holidays Lite cartridge: Gingerbreadman cut at 3" and since a shadow is n/a on lite cartridges, I cut the red Gingerbreadman background at 3 1/4 to create a shadow
* Red, White & Brown Cardstock from my stash
* Patterned Paper: First Edition Paper "Festive Treats" 6x6 paper pad
* 2 x White brads & 2 x Red brads from my stash
* Red satin ribbon from my local $Store
* Colorbox Catseye Chestnut Liquid Chalk
* Warm Holiday Wishes sentiment from Michaels
* Close to My Heart Cranberry Ink
* Glue pen
* 3D pop dots
* ATG

Here is a look at the inside of the card......

So now that you have checked out my two cards, hop on through our fun little blog hop and see what the other crafty ladies have created....your next stop is the lovely (and my BFF) Heather.

Here is the complete list for the hop.   Incase you get lost along the way come on back here and you can find the list again...
SHARIhttp://sharispinkpalace.blogspot.com (this is me, you are here!!)
KERRY - http://mommakcrafts.blogspot.com/

If you are interested in joining in on this fun hop the 25th of each month through to November, please let me know, we would like to find at least 1 or 2 more people to join in, and hey you never know, if we get some good feedback from you we may even throw in some Christmas candy in the upcoming months just for hopping around our blogs =)   (hint*hint*wink*wink*)

I hope that you enjoyed my cards today and maybe been inspired to get a head start on your Christmas cards as well.  I would love to hear from you after you have visited all the tallented ladies to know what you thought of this fun little hop - please come back and leave me a comment to let me know.

AND REMEMBER: ONLY 9 MONTHS TILL CHRISMTAS!!!!


I would like to enter my cards into the following Challenges:

* Winter Wonderland - Photo Inspirational:  My Gingerbreadman card as I made a big red bow on the card to match the photo shown.

* Stampin for the Weekend - Anything Goes: I would like to enter my Ho Ho card for this challenge (Digi image)


* Cardmadfairy's Digi Days Challenge #29 - Sentiment: I would like to enter my Ho Ho card for this challenge (Digi image and sentiment)


Hope to see you back real soon.    

Until next time, keep crafting!

Shari

Monday, March 12, 2012

A Twilight Weekend!

Hello my crafty blogland friends!  This past weekend I hosted a Twilight Movie Marathon Party with a few of my best buds! And boy did we have a great time!

This coming Sunday is my birthday but I am stuck working on Saturday and knew if I wanted to do anyting with my girlfriends for my birthday that it would have to be a week early, so I asked them to come over to my house to watch all 4 of the Twilight movies.  Everyone brought a potluck dish for our dinner and everyone also brought a snack for us to munch on during the movie marathon- oh my goodness there was sooooo much food, and boy was it goooood!

As all my friends know, I am a little bit (just a little) crazy about Twilight.  One weekend when my hubs and I were out and about I asked him to stop at every party store that we could find so that I could find Twilight decorations, and we were successful!  In the picture below you will see how my dinning room table was all decked out. I purchased a gift bag and tissue at a local $Store for my centerpiece, I found Twilight dinner plates with Bella, Edward & Jacob on them, also found Jacob & Edward side plates  as well as a Twilight (Cullen Family) tablecloth, man I was so excited when I saw it all in the store (skweeled like a little girl, as my hubs turned and went away from me so he would not be seen with the crazy lady).  I made Raspberry punch to have the red look of the vampires drink, and also made cherry Jello shooters for the event (yummm).  You will also notice that there is another item on the table that I have not mentioned, but dont worry I will get to that shortly - It was a gift I made for all my girlfriends who attended, and yes it was made using my copics of course!  You will have to read on to see what it is =)

Here is a close up of the awesome plates I found........ I am so Team Edward and I of course had an Edward plate ;)

Alright you don't have to wait any longer, below you will find my special gift to all my girlfriends.....
 I made each of my girlfriends a Twilight bookmark for them to use when re-reading the Twilight Saga.  On one side of the bookmark is Bella & Edward and on the other side is Jacob, so depending if they are Team Edward or Team Jacob then they have the option.  I got the Twilight digi images from Sassy Studio Designs (I am so in love with all their digi stamps!), and as soon as I received these images I knew exactly what to make with them for my friends (and myself as well).  I used Black cardstock as my base of the bookmark, then backed Edward & Bella with Red Cardstock and Jacob with Grey Carstock.  I punched the top and bottom edge with my EK Success boarder punch then used a hole punch at the top to make room for the 3 strands of ribbon (black, red and white with a siver boarder) to give the tassel look.

Here is a closeup of the coloured images....
COPIC COLOURS USED:
* Bella's Skin:  E11, E00, E000
* Bella's Hair:  E29, E27, E25, E23
* Bella's Eyes: E27, E23
* Bella's Lips: R39, R37
* Bella's Eyeshadow:  E70
* Bella's Shirt:  R59, R39, R37, R35
* Bella's Pants:  E79, E77, E74
* Edward's Skin:  E00, E000, E000
* Edward's Lips:  R20
* Edward's Hair:  E59, E25, E17
* Edward's Eyes:  YR27, YR24
* Edward's Shirt:  W9, W7, W5
* Jacob's Skin:  E13, E11, E00
* Jacob's Lips:  E13, E11
* Jacob's Hair:  W9, W7, W5
* Jacob's Eyes: E29
* Jacob's Shirt:  W5, W3, W1
* Jacob's Pants: E89, E87, E84
* Jacob's Shoes:  W7, W5, W3, W1

 
I would like to enter my bookmark in to the following challenges;

* Love to Create Challenge #6 - About the Ladies (Gifts for all my girlfriends!)

* Charisma Cardz Challenge #9 - Ribbon Ribbon Ribbon (well I think my tassels cover that!)

* Jelly Park Challenges - National Crafting Month Challenge (I never seem to make any craft these days with out my Copics!) 
Jelly Park also has an amazing free didgi stamp available to you, go check it out, just click on the above Jelly Park Challenges link!!

I hope that you enjoyed my post today and feel free to leave me a commnet, I love to hear from you and also visit your blogs too.  Hope that you will come back soon to see me =) 

Don't forget, coming up on the 25th of the month (and every month through to November 25th) I will have 2 Christmas cards to show you.  If you are interested in joining in on a fun Christmas card hop with me and a couple of friends, please let me know either by commenting or e-mailing me at shari.green@live.ca.

Until next time, keep Crafting!
Shari


Saturday, February 25, 2012

A New Monthly Tradition! 10 Months Till Christmas!

Hello there! Sorry I have been MIA for a little bit, my day job seems to keep getting in the way of my fun time..grrrr! LOL.

This blog is a little lengthy but I hope that you will take the time to read it through as there is some information you may be interested in.

Back in December when I was trying soooo hard to get all my Christmas cards completed in time (which did not happen) I made a decision/resolution for 2012 - "Make at least 2 Christmas cards each month of the year and post on my blog every 25th of the month" (excluding January, needed a break) and by December I should have at least 20 Christmas cards completed!

I told this story to my BFF Heather and she loved the idea so much that we decided to make a MINI blog hop for you to see our Christmas creations =).  Both Heather and I love to colour with our Copics and use our Cricut machines so we decided to make one card using our Copic markers (as you know I use A LOT) and one card using our cricut (which has been collecting dust in my palace).

After you finish viewing this post, if you are interested in getting a head start on your Christmas cards and would like to join us each month, please send me an e-mail to shari.green@live.ca with your blog address and then I will be in touch with the details.  This mini hop is just for fun, to help us complete our Christmas cards on time and to remove the excess stress that the holidays bring.

Here is a picture of my two cards....yeah two cards made for Christmas 2012!! 

Here is a picture of my COPIC card....
 SUPPLIES USED:
4 x 5.5 card and envelope
Copic Xpress Paper
Memento Tuxedo Black Ink
House Mouse Designs stamp: Footloose & Fancy Free
Christmas Spirit sentiment stamp:  Kaiser Craft Christmas Sentiments
Spellbinders Nestabilities:  Distressed Rectangles
Pattern Paper:  First Edition Paper 6x6, Festive Treats
Green Cardstock: Bazzil
Red Cardstock: from  my scrap bin
Red Ribbon from Stampin' Up
Sakura Clear Glaze Pen
Sakura Silver Glitter Pen
Scissors
3D pop dots
ATG

Here is a close up of the coloured image....Copic colours used listed below...
COPIC COLOURS USED:
Small Mouse skin colours:  RV10, RV000, RV0000
Small Mouse fur colours:  C9, C7, C5, C3
Large Mouse skin colours:  E00, E000, E0000
Large Mouse fur colours:  W7, W5, W3, W1
Christmas Tree:  G29, G28, G07, E15, E13, E11
Ornaments:  R29, R27, R24, R22, Y19, Y17, Y15, Y13, B16, B14, B12 + Sakura Clear Glaze Pen & Silver GlitterPen
Ground: E53, E51, E50

Here is a picture of my Cricut card...I don't use my Cricut card nearly enough since I found out what Copic markers were, so Heather suggested to make a Cricut card as well so that I get back to using my fun toy...
SUPPLIES USED:
4 x 6.5 card and envelope
Snowman on a sled was cut from: Jolly Holidays Lite Cricut cartridge from Wal*Mart
Happy Holidays sentiment stamp fromthe $1.50 bin at Michaels
Close to My Heart Cranberry Ink
All papers usedwere found in my scrap bin
Snowflake punch: Martha Stewart
Red & White Twine: Martha Stewart
2 x Black mini brads for the eyes from Michaels
White button is from my stash (think it was an extra button from a blouse I bought)
Grey Creative Memories marker to outline the snowman
Creative Memories Tearing Tool to make the snowy hill
Zig Glue
Glue Dots
ATG

Here is a close up of the Cricut Image....
CRICUT CARTRIDGE USED:
Jolly Holidays Lite Cricut cartridge

I hope that you enjoyed this post and are encouraged to start to make your Christmas cards early and maybe join in on the fun on March 25th and every month through to November 25th! 


Please now go over to Heather's blog to check out her two Christmas cards:  http://princesspaperprojects.blogspot.com/


Also, My friend Mary has just started a blog this week and will be joining us next month with this fun mini Christmas card hop, please pop over to her blog to welcome her to blogland: http://maryshappyplace.blogspot.com/


I would like to enter these cards into the following Christmas Card Challenges: 

* Crafty Hazelnuts Christmas Challenge (CHNC#61-Use Ribbon and/or Charm)
I have used red ribbon on my Mouse card!

* Sassy Studio Designs (DTBST #113Make a Christmas card with traditional colours)
My Mouse card is Traditional Colours: Red & Green =)


Thank you for visiting today and I hope that this post was not too long for you. I hope that you will e-mail me to join in on the fun for March 25th!

Until next time, happy crafting! (& Merry Christmas, LOL)
Shari

Sunday, February 12, 2012

Be Mine! (A Valentine for my Honey)

Hello again!  Yes I am back with another post so soon, did you see my Birthday card that I made for my boss?  If not scroll down and check it out once you have read this post.

The card I am going to show to you is the Valentine card I made for my wonderful Hubby.  As some of you know I like a Martini every once and a while (well maybe every time I see my shaker looking lonely on the weekends, lol), so I decided to make a sexy martini card for my hubby.

The image I used is one that I won from Sassy Studio Designs.  I am so in LOVE with her images. I have a few now so I am sure that you will be seeing a lot more of them in my future posts.

Here is my Sexy Valentines card for Bill....
 SUPPLIES USED:
* Martini Pin-Up Digi Stamp from Sassy Studio Designs
* Be Mine! Sentiment stamp from Kraftin' Kimmie Stamps from the Snips and Snails Stamp Set
* Hugs & Kisses! Sentiment stamp from Kraftin' Kimmie Stamps from the Raychel Stamp set
* Valentine's Day Sentiment stamp from Close to my HeartA Little Everything Stamp Set (I hand wrote the word "on")
* 5x6 Card and envelope
* Copic X-press Paper
* Memento Tuxedo Ink
* Copic Markers (Colours used listed below)
* Pattern Papers from Echo Park 6x6 Yours Truly
* Black and Red cardstock from my scrap box
* Close to my Heart Cranberry Ink
* Sakura Clear Glaze Pen (for eyes, lips and small Martini glass)
* 3D pop dots
* AGT

Here is a view of the inide sentiments....

Here is a close up of the image....
COPIC COLOURS USED:
* Skin:  E11, E00, E000
* Hair:  YR24, Y26, Y21, YR20
* Dress, Shoes & Gloves:  W9, W7, W5
* Stockings:  AN EXTRA LAYER OF E11, E00, E000
* Lips:  R29, R24
* Eyes:  B91
* Eyeshadow:  E70
* Toothpicks:  E25, E53, E51
* Olives: YG17, YG25, YG13
* Martini Glass:  BG11, BG10


I would like to enter this card into the following challenges:


I hope you enjoyed this post.  I really enjoyed making this card for Bill and colouring it was so much fun.

Until next time, keep crafting!  see you soon,
Shari


This card was chosen for the Top 3 at Cards For Men!


Happy Birthday Leah

Hello Blogland buddies!  Today I have a cute Birthday card to show to you that I made for my boss at work.  Leah and I are both the same age (well she is a month older than me) so I thought this card would be cute for her.
 SUPPLIES USED:
* 5x6.5 White Card & envelope
* Copic X-press Paper
* Memento Tuxedo Ink
* Copic Markers
* CC Designs - Cupcake Birgitta Stamp
* Happy Birthday sentiment from $1.50 bin
* Cupcake Sentiment was given to me by a friend and I sorry to say I do not know the supplier
* Sakura Clear Star Pen (For fairy Wings)
* Sakura Clear Glaze Pen (For the cherry and eyes)
* Glittery Polkadot paper frommy scrap bin
* Red Cardstock from Creative Memories, Red 12x12 paperpack
* Pink Cardstock from Michaels Recollection paper pack
* 3D pop dots
* AGT

Here is a close up of the Cupcake sentiment, such a cute saying!......

Here is a close up of Birgitta to see the Copic colours I used.....
COPIC COLOURS USED:
* Skin:  E11, E00, E000
* Hair:  E25, YR24, Y26, Y21, YR20
* Dress & Tights - Reds:  R29, R27, R24, R22
* Dress & Tights - PinkS:  R56, R85, R83, R81, RV10
* Shoes:  E74, E71, E70
* Cupcake Basees:  E74, E71, E70
* Cupcake Icing Top:  R85, R83, R81, RV10
* Cupcake Icing Bottom: R29, R27, R24, R22
* Cherry on Top:  R29, R24
* Wings: Sakura Clear Star Pen


I would like to enter this card into the following challenges:
* Cupcake Craft Challenges (Pink & Red)
* The Pink Elephant Challenge (Pink)
* Charisma Cardz (Things with Wings)
* Sassy Studio Designs (Birthday Card)
* Sundays with Crissy (Birthday's)
* All That Scraps Wednesday Challenge (Anything Goes)
* Craft UsCrazy (Anything Goes)

I hope that you enjoyed this card and will be back again to see more of my designs =) 

Until then, keep crafting!
Shari

Monday, February 6, 2012

Happy Birthday!

Wow Look at me!  Two posts in two days!  lol.

Hope you are doing well today.  Today I want to show you a Birthday card that I made on the weekend while my BFF was over and we were playing in my Pink Palace.

The image I used on this card is one of my newest stamp purchases and I could not wait to get to work on a card using one of the sweet girls that come in this set.  The set is called Sugar and Spice and is part of the Kraftin' Kimmie Stamps line and the artis is Cheryl Alger.  In the set you get 3 images of this adorable little girl with a bunch of cute sentiments as well.  There is also a little boy set called Snips and Snails with 3 little boys on it that I have, but you will have to wait to see that set on a later post :)

When I was colouring this image I desided to create a nose using the copic colours.  I am sooooo very HAPPY how the nose on my little girl worked out.  I just kept telling  my BFF that "I love her nose!"  Iguess practice does make perfect using these markers, lol.

Check out my card (and her awesome nose) below....(click on the image to view it larger is you like)
 SUPPLIES USED:
* 5x6.5 White card and envelope
* Copic X-Press paper
* Memento Tuxedo Black ink
* Copic Markers
* Printed papers are all from Simple Stories 6x6 Baby Steps paper pack
* Blue cardstock from Michaels Recollection paper pack
* Stamp is from Kraftin' Kimmie Stamps called Sugar & Spice (artist: Cheryl Alger)
* Happy Birthday sentiment is from $1.50 bin at Michaels
* Versa Mark Ink
* Michaels Recollections Clear Bark (Brown) embossing powder
* Martha Stewart Heating Gun
* Catseyes Liquid chalk in Dark Brown & Ice Blue
* Rhinestones x 5 and attached using my I*Rock (3 on dress, 1 for i in Birthday and 1 in the flower)
* Baby Blue Stickles to shimmer up the balloon
* Creative Memories punchs to make the flower: 1" circle punch, 2 different flower punches and the splat punch
* 3D Pop Dots to pop the image
* AGT

Here is a close up of the little darling to see the colouring better (and her nose)........
COPIC COLOURS USED:
* Skin:  E11, E00, E000
* Hair:  E34, YR24, Y26, Y21
* Dress and Shoes:  E49, E47, E44, E43
* Socks, Bow and trim on sleeves:  B01, B00, B000, B0000
* Ground:  G46, G43, G21, E44, E42
* Balloon:  Filled in with Baby Blue Stickles to add a shimmery feel to the card


I would like to enter this card into the following challenges:

* Sassy Cheryl's Challenge #100 - punch and something shimmery (I used 4 punched for the flowers and my shimmery is my rhinestomes and my stickles


* Whimsy Inspires Challenge #24 - Make your own flowers (I made my fower using 4 different punches)


I hope that you enjoyed this post and will be back to see more soon. 

Until next time, keep crafting!
Shari

Sunday, February 5, 2012

Raggedy Anne & Andy

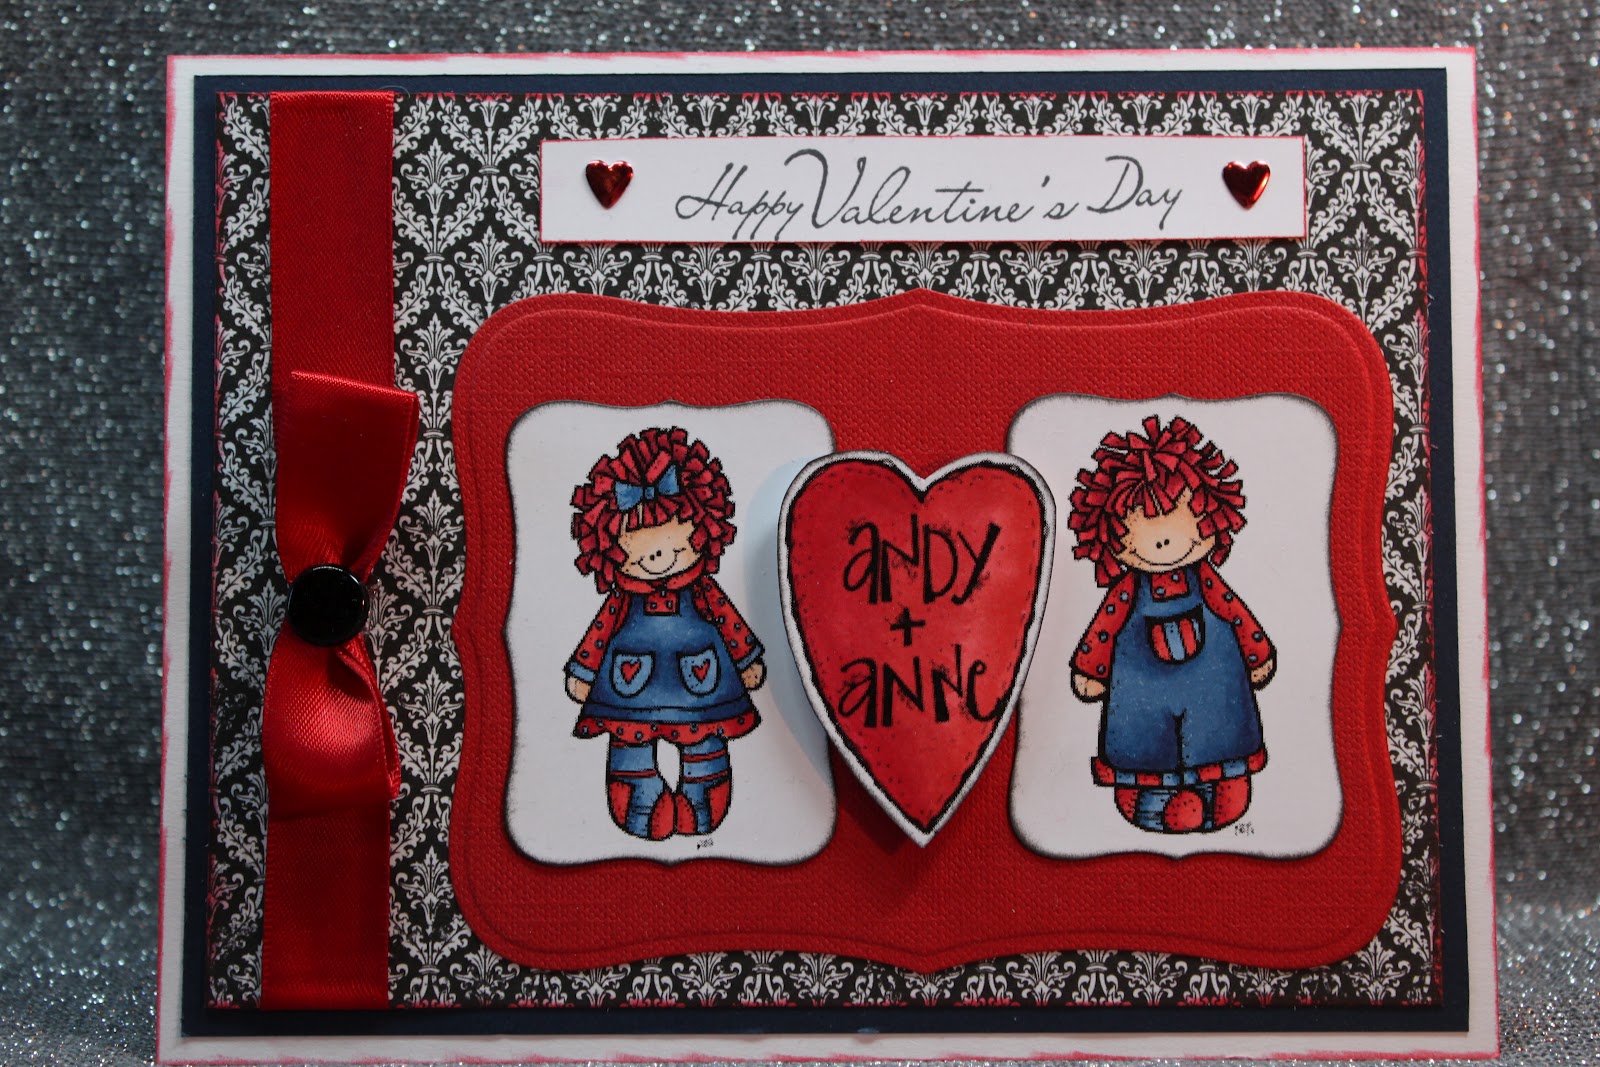
Hello there!  Today I have a Valentine's Day card I made for my Mom to show to you  =)

My Mom's  name is Anni but because of her different spelling of her name, everyone for some reason seems to call her Anne so I thought that it would be cute to give her a card with Raggedy Anne on it, so I guess my Dad is now Andy, he he he

Every year since I was a very little girl I would ALWAYS give my Mom a Valentine from me, and even though I am now married and not living at home, the tradition still continues!  My Mom will always be my Valentine no matter what  =)

Here is a picture of my card for Mom....
What do you think of the perfect satin bow?? 
Well here is a little TIP:  I cut a piece of ribbon and made it into a circle and tacked it with a tiny glue dot, then I cut a piece of ribbon just a little longer than the card and put it behind the circle ribbon I made.  Then I took a brad and put the ribbon through the center prongs and tightened them around the ribbon circle & ribbon strand, and Voila! a perfect bow with ribbon for your card =)

SUPPLIES USED:
* 5x6.5 White card and envelope
* Copic X-Press Paper
* Memento Tuxedo Black Ink
* Copic Markers
* Anne and Andy Digi stamp from Melonheadz Illustrating (daily freebies)
* Happy Valentine's Day sentiment from Ink-d-dink-a-doo
* You Are Loved sentiment from Michaels $1.50 bin
* mom sentiment from Close to my Heart
* Pattern Paper is BoBunny 6x6 Enchanted Collection
* Red Cardstock is Textura Bold Paper Pack from my local $Store
* Navy Cardstock is from my scrap bin
* Red Satin Ribbon from my local $Store
* Red matalic hearts (x3) from Imaginisce using my I-ROCK tool to atttach
* Black Brad (unknown source) for center of bow
* Spellbinders Nestabilities Label 8 (for each Anne and Andy + red matting)
* Creative Memories Black Liquid Chalk
* Michaels Recollection Red Liquid Chalk
* AGT
* 3D pop dots for Andy + Anne heart
* Glue Dots to stick brad on to card

Here is a view of the inside sentiment....

Here is a close-up of Anne & Andy......
COPIC COLOURS USED:
* Skin:  E11, E00, E000
* Hair:  R39, R37, R35
* Clothes:  B39, B37, B34, R29, R27, R24
* Andy + Anne Heart:  R29, R27, R24


I would like to enter this card into the following challenges:

* Digital Tuesday Challenge #145 - Red, Black & White

* Fab 'n Funky Challenge #106 - Use a Digi

* Sassy Studio Designs DTBS#110 - Love is in the air

* Top Tip Tuesday Challenge #69 - Valentine's TIP-how to have a perfect bow using a brad.

* Truly Scrumptious Challenge #73 - Love & Hearts

* Little Miss Muffet Challenge #28 - Valentine's and Love

* By the Cute and Girly February Challenge - Love is in the Air

* One Crazy Stamper - February Challenge, love is in the air
* Sweet Stampin' Challenge - The One I Love

Thank you for stopping by today, I hope you enjoyed this post. I will be back very soon with another Birthday card to show you =)

Have a great day and until next time, keep Crafting!
Shari

Saturday, February 4, 2012

Enjoy Every Moment

Hello and a very Happy Saturday to y'all!  I am in such a happy mood today, my BFF Heather is coming to my house to stay the night and we are going to play in my Pink Palace colouring with our copics and making cards!  Soooooo excited to spend crafty time and girly time with Heather!!

The card I have to show you today I started out making for one challenge in particular but as I was making it, colours changed and design was changed etc. to reflect a few other challenges too.  Right now the House Mouse Challenge Blog is hosting a Blog Hop/Challenge all in one!  The theme is LOVE (with at least 2 Hearts-my paper I used is COVERED in hearts, he he he) and all you have to do is complete the blog hop they have up and leave a comment on each DT's blog, and also enter a card in the LOVE themed challenge and then you have a chance to win 1 of 5 prizes, and let me tell you, there are some AMAZING prized to be had! Fingers crossed!

Another challenge that I aimed this card towards is Simon Says Stamps Challenges as they have DT insirational samples for you to see featuring House Mouse Designs and they are encouraging you to use them too if you have them!  Their theme this week is ANIMAL ANTICS!  You do not have to use a House Mouse Design stamp any animal will do,  and they have an AMAZING prize this week too! Toes crossed for this one!

Well lets get to on to my card.  I am so happy with this card, it is a little simple for me but I love it!  Here is a photo of the card;
SUPPLIES USED:
* 5x6.5 White Card and Envelope
* House Mouse Designs Stamp; Special Delivery 02
* Copic X-Press paper
* Copic Markers (even got to use one of the NEW colours!)
* Momento Tuxedo Black Ink for the mice and sentiment
* Printed Heart Flower Paper is from the 6x6 BoBunny Crazy Love Collection
* Pink Cardstock is from Michaels Recollection 8.5x11 paper pack
* Creative Memories Brown Liquid Chalk to outline all papers and card
* Close to my Heart Enjoy Every Moment set for the sentiment "Enjoy Every Moment"
* Pink Ribbon from Michaels
* Sakura Clear Glaze Pen
* 1/8" Hole Punch
* AGT

Here is a closeup of the cute, adorable little mice inside the mailbox;
COPIC COLOURS USED: (please note the tip listed below too!)
* Mailbox: C9, C7, C5, C3, C1, C00, 0
* Mailbox Post:   E27, E25, E23
* Flower Stems & Leaves:  YG67, YG63, YG61
* Rain Drops:  BG11, BG10 + Sakura Clear Glaze Pen
* Flowers:  R56, R85, R83, R81
(TIP:  did you notice that I used the NEW R56 colour here?  It blends AMAZINGLY with the R85 family!!!!  I bet it would even blend with the R89 to pull all the R's in this series together!)
* Center of Large Flower:  dots of W7, W5
* Mice, from Left to Right
     1.)  E37, E35, E33
     2.)  W3, W1, W00
     3.)  E27, E25, E23
     4.)  W7, W5, W3

When you see this card in person the Sakura Clear Glaze Pen looks soooo nice on the rain drops and really brings them alive with a high gloss and looks like real rain drops falling.  I was so happy when I coloured this image.  When I was looking at my new Copic colours trying to use them on this project, I notice the R56 and I was so impressed with how well it blended into the R85 family, you should give it a try, you won't be disapointed.  This new colour can grow your Copic families so much between the reds and the pinks!

I hope that you liked this post and please feel free to comment.  If you know any other Copic blendings using non-family colours, feel free to let me know!  I love playing with my copics and would love to try a new/funky colour family =)


I would also like to enter the following challenges, other than the two I mentioned above in my post;

* There She Goes Clear Stamps TSG141 Insiration Photo Challenge (loved the pink flowers in the photo and had to do pink too!)

* Do you Stack Up DYSU#57-Anything Goes

* Drunken Stampers Challenge #82-Something New (my something new is my BoBunny paper pack - I LOVE BOBUNNY!!)

* Whimsical Designs Challenge #41-Bring Out the Old (my OLD is my Enjoy Every Moment sentiment.  I purchased this set a LOVG while back and had never used it yet.)

* Craft Us Crazy Challenge #20-Anything Goes

* Top Tip Tuesday Challenge #69-Valentines (Perfect Valentine for my mom cause there is 4 mice; Mom, Dad, Brother and Me! - also I have noted a TIP in my copic colours used =)

Thanks for taking the time to visit me today, until Next time, Happy Craftin!
Shari
Related Posts Plugin for WordPress, Blogger...