Christmas Countdown:

Showing posts with label Quickutz. Show all posts

Friday, September 13, 2013

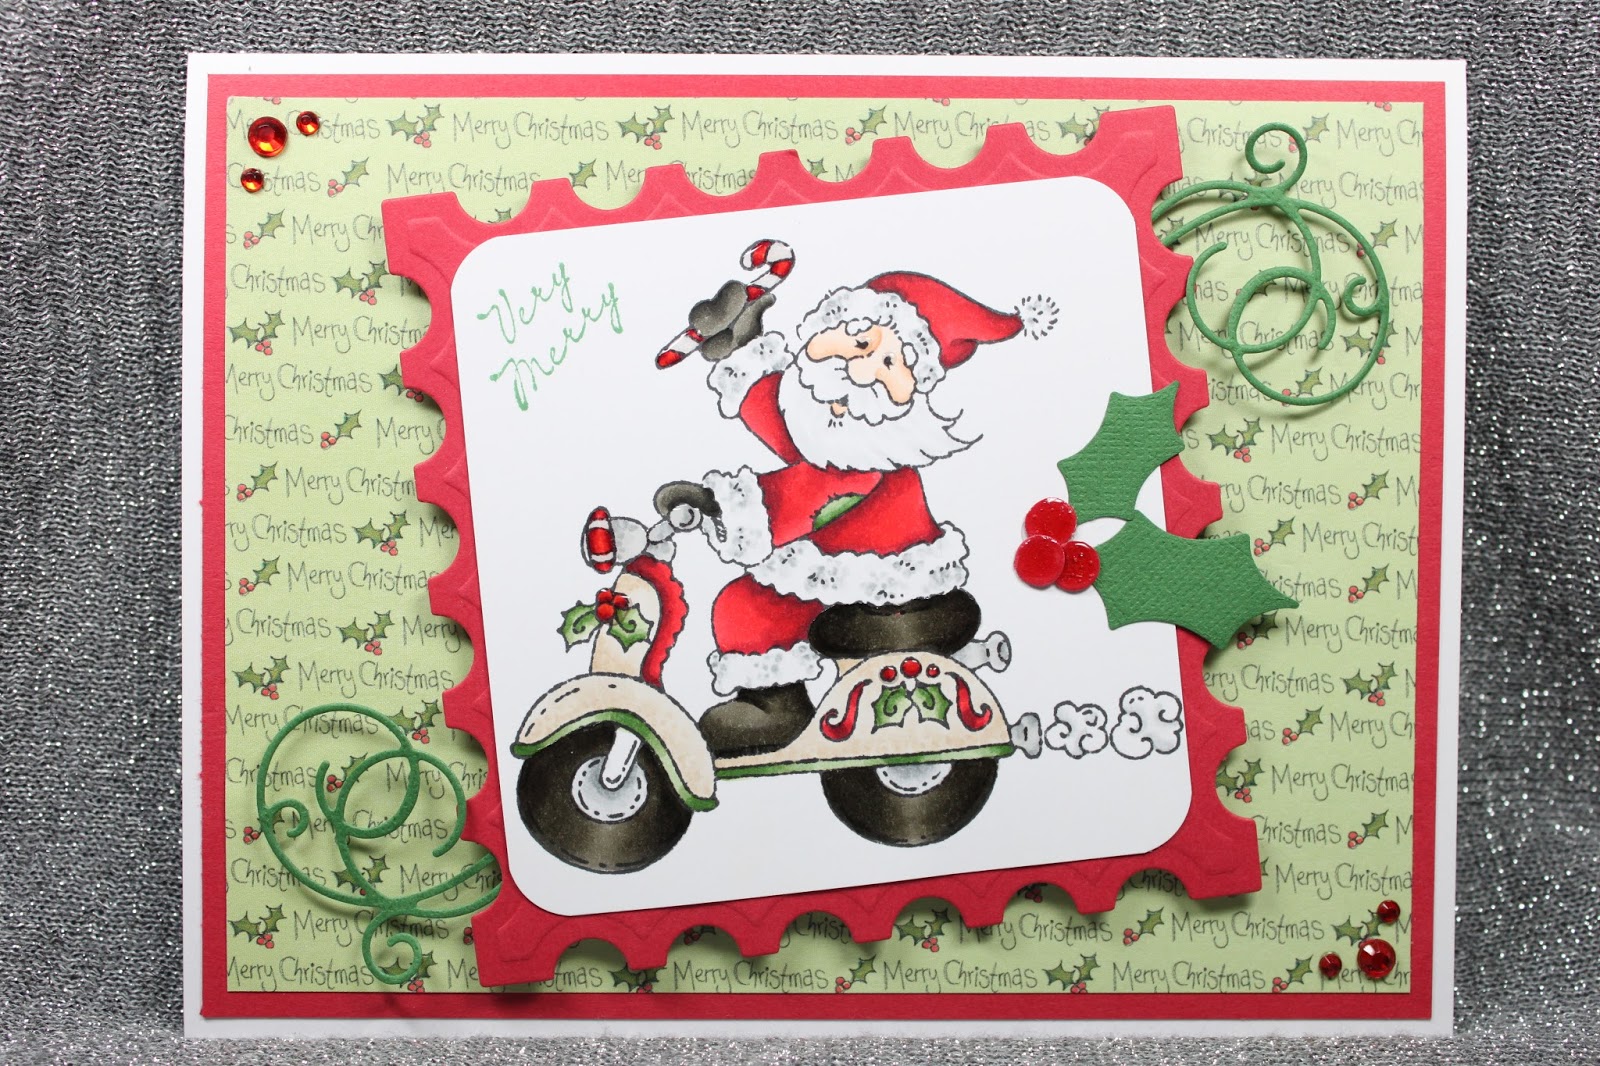
Very Merry Santa!

Happy Friday! Sooooo are you enjoying all the Christmas cards so far on the One Crazy Stamper Blog this month?  I sure am, wow these new High Hopes images are so amazing and fun!

Today I have a card to show you using Motorin' By Santa....
I chose to use the postage stamp Spellbinder as my background on this image because when I see Santa I always think of all the children writing letters to Santa so hence the postage stamp LOL.
 
Here is a look at how I decorated the inside where I used the Memory Box Die, Whimsical Flourish to bring your eye to the sentiment.... 
 Supplies Used: 
* Image:  High Hopes, Motorin' By Santa 
* High Hopes, I Believe in Santa Sentiment
* Memento Inks: Tuxedo Black & Cottage Ivy 
Memory Box Die, Whimsical Flourish 
* Paper: The Paper Studio 8.5x11, from Michaels
* Cardstock: Green- Joann's & Red-Michaels
* Spellbinders:  Classic Squares & Postage Stamp
* Holly: Quickutz Holiday Set
* Very Merry Sentiment:  Impressions Obsession
 
Here is a close up of this fun image to see the Copic colours used....
 Copic Colours Used: 
* Reds:  R39,R37, R35 
* Blacks:  W9, W7, W5 
* Greys:  N4, N2, N0 
* Greens:  YG67, YG63, YG61 
* Tans:  E42, E41, E40 
*  Glossy Accents were added to: the candy cane, the chrome on the bike, the seat, the tires, the boot and the holly berries 
 
I hope you enjoyed today's Christmas card, and maybe I have inspired you to join in this month challenge over at the One Crazy Stamper Blog!


Until Next Time, Keep Crafting!!
Merry Christmas;
 

Thursday, August 16, 2012

Pink or Blue, Happy For You!

Hello and happy FRIDAY!!!  Today I have a card to show you that I made for my Boss at work.  I made this card out of a letter size file folder as I needed the card large enough for 54 people to sign, and once signed I placed it in our 9x13 company envelope - worked perfectly!

This card was made to follow the photo colour challange over at Magnolia-licious Challenge Blog, as well as the DT call over at Totally Tilda Challenge Blog.  Here is my card I made for the arrival of my boss's baby....

The sentiment for this card was cut out using my Quickutz Squeeze Tool along with the Biography font....Pink or Blue, Happy For you!  Here is a close up of the sentiment I made.....

SUPPLIES USED:
* Letter size file folder & company envelope
* Quickutz Squeeze Tool & Biography Font
* Images:  Magnolia Princess Baby Tilda & Prince Baby Edwin
* Copic Xpress Paper
* Ink:  Memento Tuxedo Black
* Copic Markers (colours listed below)
* Spellbinder Nestabilities:  Lacey Squares & Postage Stamp
* Cardstock:  frommy local $ Store
* Patterned Paper: Tapestry by C.R. Gibson-Geo Breeze 12x12 Paper Pad
* ColorBox Chalk: Lime Pastel & French Blue
* 3D Pop Dots (for images)
* ATG
Here is a close up of Princess Baby Tilda.....
COPIC COLOURS USED:
* SKIN:  E11, E00, E000
* HAIR:  E34, YR24, Y26, Y21
* CROWN: YR24, YR23,YR21, Y11
* JUMPER:  RV29, RV25, RV23, RV21, RV10
* SHIRT:  RV21, RV10, RV000
* EYELETTE LACE:  C1, 0
* SOCKS:  RV10, RV000, RV0000
* SOOTHER:  RV29, RV25, RV23
* BOWS:  RV29, RV25, RV23
* BUTTERFLIES:  E34, B14, B00, YR24, Y11, RV29, RV23

Here is a close up of Prince Baby Edwin....
COPIC COLOURS USED:
* SKIN:  E11, E00, E000
* HAIR:  E29, E27, E25
* CROWN:  YR24, YR23,YR21, Y11
* JUMPER:  B14, B12, B00, B0000
* SHIRT & SOCKS:  B00, B000, B0000
* SHOES:  C3, C1, C00, 0
* SOOTHER:  B14,B12, B00
* STARS:  Y21, Y11

So what do you think?  I know my boss loved it, and I hope you do too =)

Until next time, keep crafting!
Hugs;
Shari


Friday, May 25, 2012

7 Months Till Christmas Fun Blog Hop

REVISION:  WHOO HOO My Reindeer card won the "Animal" Challenge over at


Hello and welcome to our "7 MONTHS TILL CHRISTMAS Fun Blog Hop" 

If you are not aware, on the 25th of each month myself and a few friend get together to show you two Christmas cards each.  One card is to be completed using a colour medium (ie: Copics, Pencils, inks, etc.) and one is to be completed using a die cut of some kind (ie: Cricut, Quickutz, Sizzix, Spellbinders, etc.).  I started this little hop back in February along with my BFF Heather who wanted to join in on the fun, and we now are well on our way to taking the stress away over the November and December months trying so hard to get all our cards made in time for Christmas.  Have you completed any Christmas cards yet?

I also want to invite to to come back to my blog on June 25th for our "6 Months Till Christmas Hop" as some blogs on the hop with have Christmas Candy for you to win!  Mark your calenders so you do not forget =)

You should have arrived here from the sweet TARA'S BLOG, but if you just happened by my blog, feel free to start at the beginning of the hop with the "UBBER Tallented" (and my BFF) HEATHER'S BLOG so that you dont miss out on all the fun!

Without further delay, here are my two cards....

First I will show you my COPIC coloured card where I used a Tilda image.  I hope that you see the same picture that I see in my head when you look at this image?  As soon as I saw this new image I said "hey that looks like a Christmas Craker hat!"  so that is what I hope you see on this card too =)....let me know.... 

 Here is a picture of the inside with a "Christmas Craker"with sentiment.....
SUPPLIES USED:
* 4x5.5 Card & Envelope
* Image:  Magnolia, PrincessParty Tilda
* Copic Xpress Paper
* Memento Ink: Tuxedo Black for Tilda and the inside sentiment
* Copic Markers (colours listed below)
* Spellbinder Nestabilites: Labels Ten
* Patterned Paper:  LOST & Found Christmas
* Cardstock:  From my scrap bin
* ColorBox Chalk: Dark Moss
* Christmas Spirit Sentiment:  KraiserCraft Christmas Sentiments
* Inside "Cracker": Cricut Sweet Treats Lite cartridge - Taffy cut at 3"
* Stampin' Up Red & White Twine (tied on the ends of the Cracker)
* Merry Bright Inside Sentiment:  Gel-a-tins (I added the + with a black copic multiliner)
* Ink used: Close to my Heart, Ponderosa Pine + Cranberry
* ATG

Here is a close up of the beautiful Princess Party Tilda in her "Christmas Craker" hat....I think I am getting a hang of these saturated blends!......
COPIC COKOURS USED:
* SKIN:  E11, E00, E000
* HAIR:  E59, E25, E31
* HAT:  W7, G29, G28, G46, G07
* DRESS & SOCKS:  W7, R89, R59, R39, R37 (think this is my new fav colour combo!)
* SHOES:  W3, W1, W00 + W5 for the soles
* LACES:  R59, R39
* GROUND:  W1, W00, 0

Now on to my QUICKUTZ card....."Rudolph the Red Nose Reindeer"....
SUPPLIES USED:
* 4x5.5 Card & Envelope
* Quickutz 2x2: Reindeer
* Zig Glue Pen (to put together reindeer parts)
* Cardstock:  all from my scrap bin!
* Patterned Paper:  Jellibean Soup 12x12 paper (sorry forget actual name)
* My Favorite Things Die-namics, Flags
* I*Rock Tool
* I*Rock Teenie Tiny Black Gems for eyes
* I*Rock Red Gem for Reindeer Nose
* Red Bling from Jolee's (Michaels)
* Ink:  Close To My Heart, Cranberry
* Sentiment:  Kraftin' Kimmie, Rudy the Reindeer sentiment
* Sakura Clear Glaze Pen (for reindeer's antlers)
* 3D Pop Dots (for Reindeer)
* ATG

Well I sure hope you enjoyed today's post as much as I enjoyed making the cards and sharing them with you!  Now it is time for you to pop over to the very talented GEORGIANA'S BLOG to see what she has created. 

Remember, come on back in June on the 25th for your chance to win some CHRISTMAS CANDY!!

In case you get lost along the way, here is this month's blog hop order;
Shari (ME!!!) 


I would like to enter this card into the following CHRISTMAS Challenge;
* Christmas Cards All Year Round, May 2012 Challenge:  Christmas Carols - I would like to enter in my "Rudolph the Red Nose Reindeer" Card for this challenge.

I would like to enter this card into the following Challenges;
* Totally Paper Craft Challenge #118: Animals - I would like to enter in my "Rudolph the Red Nose Reindeer" Card for this challenge.


Thank you for visiting me today & I would LOVE to hear from you, your comments always brighten my day =) !

Until Next Time, Keep Crafting!
Lots of Hugs; 
Shari

Thursday, April 26, 2012

DTBST#122 - Christmas/Holiday with a sentiment (Santa's Helper)

Hello and welcome to another DTBST Challenge!  The last Thursday of every month we are asked to make a Christmas/Holiday project and this week we are to also add a sentiment.

If you are a follower of my blog, then you know that once a month I do a Fun Christmas Blog Hop showing 2 Christmas cards (yesterday's post, check it out), so this month I will be completing 3 Christmas cards to add to my collection thanks to the SSD challenge this week.  Man I am just knocking so many cards off my Christmas card list for this year!  Whoo Hoo, Yeah Me!  So far in total, counting this post I have 7 cards completed for Christmas, how many do you have made so far?

Here is my DTBST Christmas/Holiday card with Sentiment for you this week....
SUPPLIES USED:
* Image:  Sassy Studio Designs - Santa's Helper
* Copic X-press Paper & Laser Printer
* Copic Markers (colours listed below)
* 5x6.5 card & envelope
* Outside Sentiment: Stampendous Cling Rubber
* Inside Sentiment: Kraftin' Kimmie Christmas Interior Sentiments
* Patterned Paper:  First Edition Paper 6x6 Paper Pad - Festive Treats
* Cardstock:  Michaels Recollections Paper Pack
* Spellbinders Nestabillities: Labels 10
* Cuttlebug
* Spellbinders Silicone matt for embossing theimageand outside sentiment
* Quickutz 2x2 Holly Leaves
* Creative Memories Bubble Punch (for Holly Berries)
* Ribbon from Michaels
* Yellow Ink: Michaels $1.50 bin (to colour the shape of the outside sentiment)
* Red Ink: Close to my Heart - Holiday Red(for inside sentiment)
* Inkssentials Blending Tool (to colour in the outside sentiment shape)
* Color Box Chalk: Lipstick Red & Olive Pastel (to outline the image shape and the patterned paper)
* Glossy Accents (for holly berries, bells, eyes & lips)
* ATG


Here is a picture of the inside sentiment.......

Here is a closeup of the image (copic colours used note below).....Please also note, that I used a craft knife to make two slits in the side of the images' shape to be able to thread the ribbon through to "hold down the image".....
COPIC COLOURS USED:
* SKIN:  E11, E00, E000
* HAIR:  E49, E59, E25
* EYES:  E25, E23
* LIPS:  R24, R22
* CLOTHES:  YG67, YG63, YG61
* BELLS:  Y26, YR21
* PRESENT:  Y23, Y21, Y11, Y00
* BOW:  R46, R29, R27, R24, R22

Be sure to pop over to Sassy Studio Designs Blog to see what creations my Sassy Sisters have created as well, and to enter your Christmas/Holiday with Sentiment project into this weeks challenge =)


I would like to enter this card into the following challenges:
* Love to Create Challenge #12 - Anything Goes
* Make It Monday Challenge #86 - Anything Goes
* Fussy & Fancy Friday Challenge #61 - Punches/Die Cuts
* Inky Impressions - Anything Goes
* Simon Says - Anything Goes
* The Pink Elephant Challenge #TPE145 - Hello Sunshine (Use Yellow)


Until next time, keep crafting!
Shari
Wednesday, April 25, 2012

"8 Months Till Christmas" Fun Blog Hop

Welcome to our "8 Months Till Christmas" Fun Blog Hop.  This is our 3rd month now doing this little fun hop and we now have 6 people joining in on the fun.  The reason I started this fun hop was to force myself to create at least 2 Christmas cards a month so that when December came I would have quite a few cards already made, and so that I was not so stressed out come November/December trying desperately to get my Christmas card list completed.  I mentioned this to my BFF's Heather and Mary and they said they liked the idea and wanted to join me on this adventure.  Since we have started, we have found 3 other ladies to join in on the fun!  

If you are following the hop you shoud have come here from the very talented MARY'S blog, but if you happened by my blog just by chance, please go to GEORGIANA'S blog to start at the beginning.   Below you will find a blog list for you to follow in case you have gotten lost.  Hope that you may get some Christmas inspiration from this hop so that you too can start your cards early this year.

Here is a picture of the two cards I made for this month.....we always do one card with a colouring medium and one card with a die cut tool.....

Here is my first card I want to show you using my COPIC MARKERS & a Bugaboo Stamps image....
SUPPLIES USED:
* Image: Bugaboo Stamps - Mistletoe Fairy
* 4x5.5 card & envelope
* Copic X-Press Paper
* Copic Markers
* Memento Tuxedo Black Ink
* Patterned Paper:  First Edition Paper 6x6 Paper Pack - Festive Treats
* Cardstock: all from my stash
* Ribbon:  from my stash (very very old, kind of a horder of ribbon!)
* Spellbinder Nestabilities: Blossom 3
* Cuttlebug to cut and emboss the Spellbinder shape
*Spellbiders Rubber Embossing Sheet
* Sentiment:  from Michaels $1.50 bin (coloured with copics)
* Color Box Chalk: Lipstick Red
* 3d Pop Dots for image and sentiment
* ATG

Here is a close up of the coloured image (copic colours used listed below).....
COPIC COLOURS USED:
* SKIN:  E11, E00, E000
* HOLLY LEAVES:  YG67, YG63, YG61
* HOLLY BERRIES / DRESS / /SOCKS:  R39, R37, R35
* HAIR:  E59, E39, E31, E50

Here is my second card I want to show you using my QUICKUTZ SHAPES....
SUPPLIES USED:
* 4x5.5 card & envelope
* Cardstock:  all from my scrap bin (whoo hoo!!)
* Patterned Paper:  My Minds Eye 6x6 Paper Pad - Lost & Found Christmas
* Quickutz Shapes (2x2 dies): Santa, Mrs.Claus & Reindeer Head.
* Quickutz Holiday Set: Mini Ornament & HOHOHOHOHO Sentiment
* Quickutz Squeeze Tool (to cut Santa, Mrs. Claus and Rudolph)
* Cuttlebug (to cut ornaments and hohohohoho sentiment)
* Spellbiders Rubber Embossing Sheet to emboss the ornaments.
* Zig 2way Glue Stick (to put all the peeps together)
* Stickles: Silver (for tops of ornaments)
* Glossy Accents: for Rudolph's nose
* imagibisce i*rock tool + tinnie tiny black gems for all the eyes + small red metallic rounds for the berries on Mrs. Claus' headband
* EK Success Powdered Chalk for definition on all the faces (pink for cheeks and nose, grey for beard and hair & brown for reindeer)
* Color Box Chalk: Berrylicious
* 3D Pop Dots
* ATG
Here is a close up of the cut shapes so you can see the chalk effects and the eyes better....

Well that is all for me to day, I sure hope that you are inspired to get into your craft area and maybe get ahead start on your Christmas cards too!  Please leave me a comment if you have time, I love to hear from you  =)
Now it is time for you to hop on over to TARA'S blog to see her awesome creations!
Dont forget to mark your calender for May 25th to join us again for our "7 Months Till Christmas" fun blog hop for even more inspiration!


I would like to enter my cards into the following Christmas Challenges:
* Jingle Belles Rock: Peace on Earth (in lieu of Earth day: recycle/reuse/repurpose) - I used SCRAPS from my scrap bin on BOTH cards!
* Christmas Inspiration Challenge #45: BINGO - I made a line on my bingo card using Layers/Green/Glitter on my Quickutz card
* Always Playing With Paper (Merry Monday) Challenge #17: follow sketch - for this challenge I am submitting my Quickuts card =)

I would also like to enter my cards on the following regular challenges:
* Love to Creat Challenge #12:  Anything Goes
* Make It Monday Challenge # 86:  Anything Goes
* Fussy & Fancy Challenge #61:  Punches & Die Cuts - well both my cards have Die cuts but for sure my Quickutz card =)
* Shopping our Stash Challenge #49: Something with "B" - I used a BUGABOO image =)
* Inky Impressions Challenge:  Anything Goes
* Simon Says - Anything Goes

Until next time, keep crafting!
Shari
Related Posts Plugin for WordPress, Blogger...